Smart Reports - User Documentation

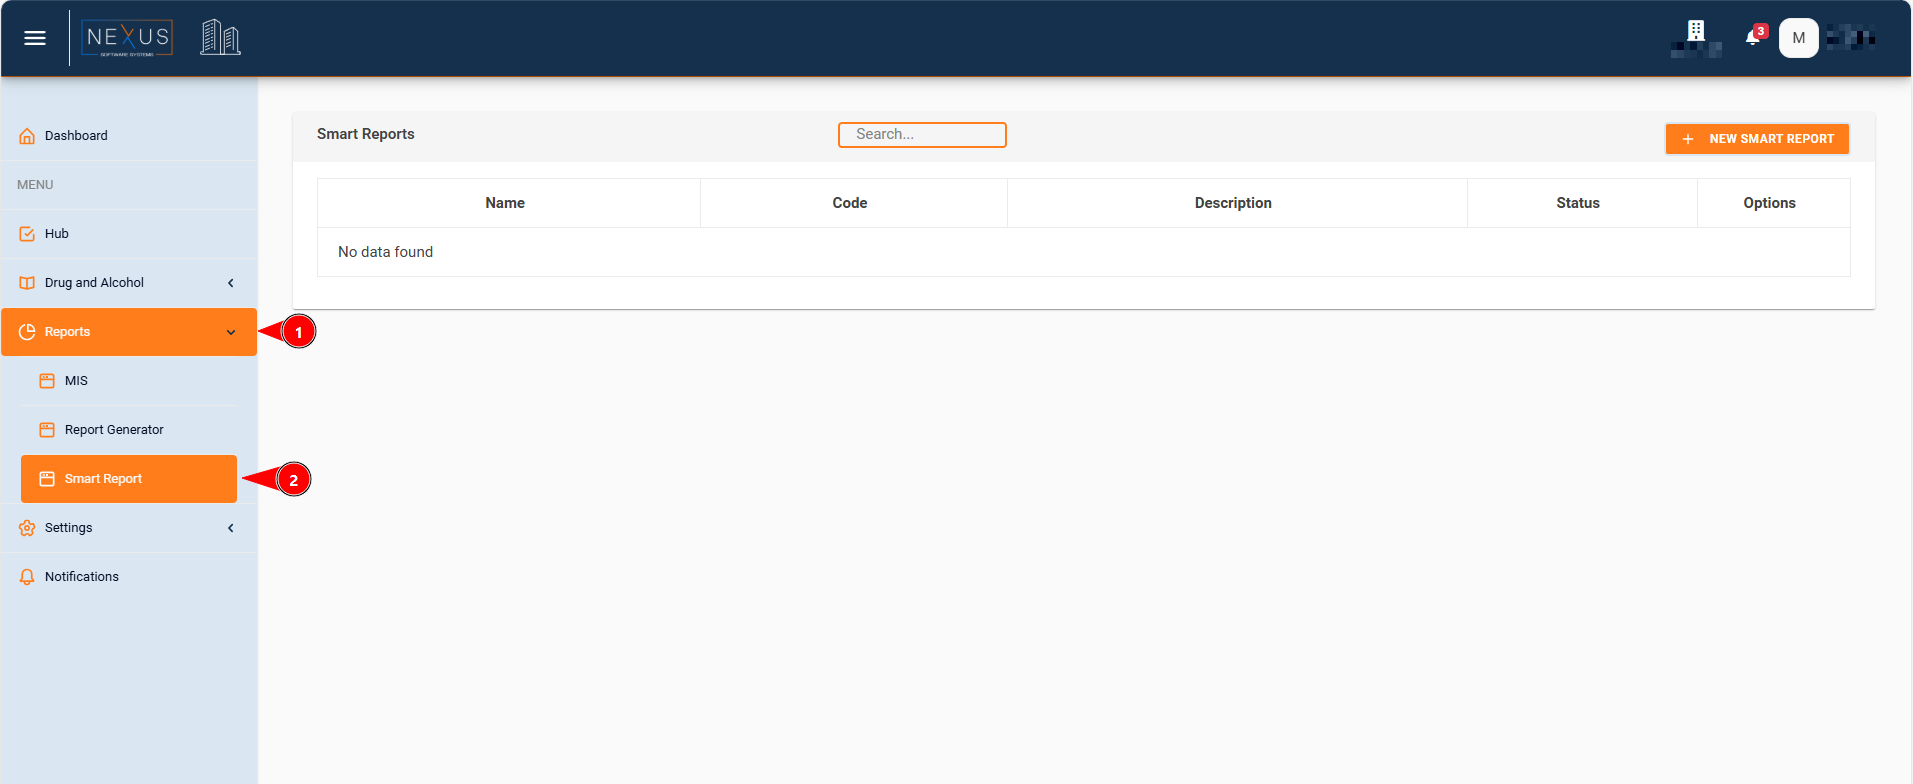
Table of Contents
Introduction
Smart Reports is a powerful feature that allows you to create customizable reports with dynamic data filtering, automated scheduling, and email distribution. Reports can be configured with specific columns, filters, and execution schedules to meet your business needs.
Key Features
- Customizable Columns: Select which data fields to include in your report
- Advanced Filtering: Apply filters to narrow down data, including dynamic time-based filters
- Automated Scheduling: Configure reports to run automatically at specified intervals
- Email Distribution: Send reports directly via email to multiple recipients
- Download Reports: Export reports as Excel files
Smart Reports List
The Smart Reports list page displays all available reports for your organization. This page provides several options for managing your reports.
Page Layout
The list page contains:
- Header Section:
- Title: "Smart Reports"
- Search bar
- "NEW SMART REPORT" button (if you have permission to create reports)

Search Functionality
Location: Top right of the header
How to Use:
- Type your search query in the search box
- Press Enter to search
- The system searches across:
- Report Name
- Report Code
- Description
Note: To clear the search, delete all text and press Enter.

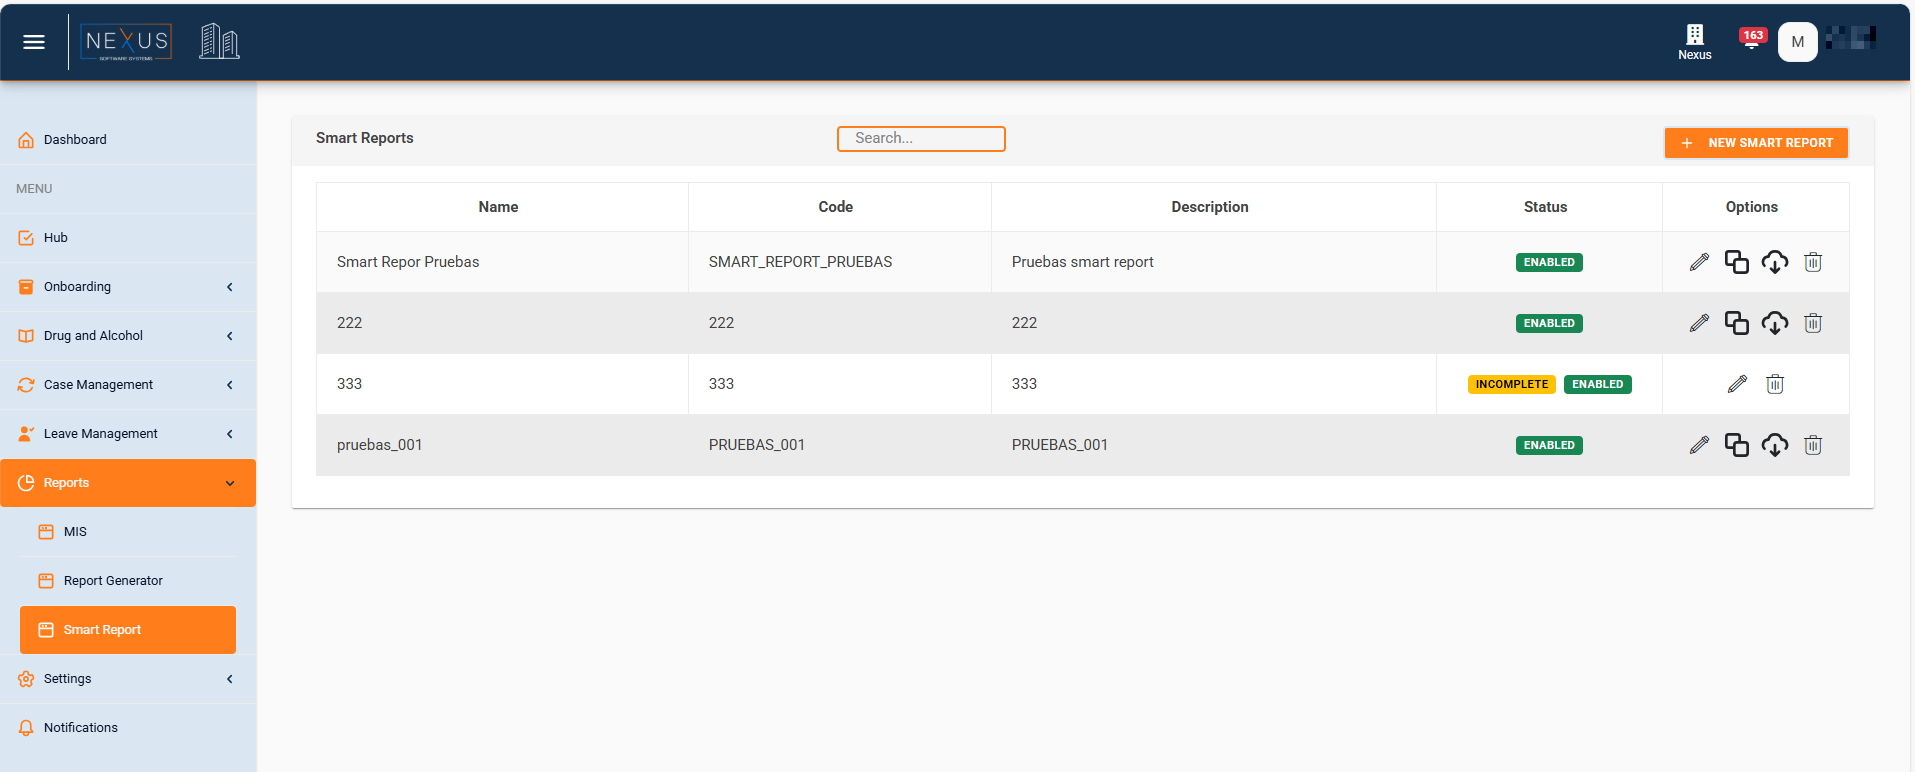
Table Information
The reports table displays the following information:
-
Name
- The display name of the report
-
Code
- Unique identifier code for the report
-
Description
- Brief description of the report
- Long descriptions are automatically shortened with "..."
-
Status
- Shows two status indicators:
- Report Status:
- 🟡 INCOMPLETE: Report has no columns configured yet
- 🟡 INCOMPLETE: Report has no columns configured yet
- Enabled Status:
- 🟢 Enabled: Report is active
- 🔴 Disabled: Report is inactive
- Report Status:
- Shows two status indicators:
-
Options
- Action buttons for each report (see below)

Action Buttons
Each report row has action buttons in the "Options" column. Available actions depend on your permissions and the report status:
1. Edit

- When Available: When you have permission to edit reports
- Function: Opens the report in edit mode so you can modify it
- Note: Only available for existing reports
2. Duplicate

- When Available:
- When you have permission to create reports
- Only for reports that are not INCOMPLETE
- Function: Creates a copy of the report with:
- Same configuration (columns and filters)
- Same execution schedule
- New name: "[Original Name] (Copy)"
- New code: "[Original Code]_COPY"
- Note: The duplicate opens in create mode for you to modify
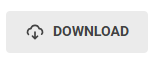
3. Download Report

- When Available: Only for reports that are not INCOMPLETE
- Function: Downloads the report as an Excel file
- File Naming: Includes report name and date/time
- Note: The report is generated with current data
4. Delete

- When Available: When you have permission to delete reports
- Function: Permanently deletes the report
- Confirmation: A confirmation dialog appears before deletion
- Warning: This action cannot be undone
Permissions
Actions are controlled by your user permissions:
- Create Reports: Required to create new reports and duplicate existing ones
- Edit Reports: Required to modify existing reports
- Delete Reports: Required to remove reports
If you don't have the required permission, the action button won't appear, or a warning message will be shown.
Pagination
The table includes pagination controls at the bottom to navigate through multiple pages of reports.
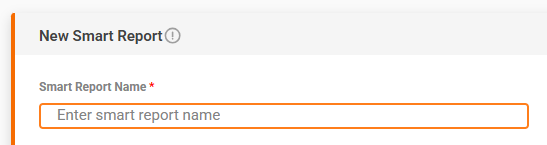
Creating a Smart Report
Accessing the Creation Page
Method 1: From the Smart Reports list
- Click the "NEW SMART REPORT" button in the header
- You'll be navigated to the creation page
Method 2: By duplicating an existing report
- Click the "Duplicate" button on an existing report
- The creation page opens with pre-filled data

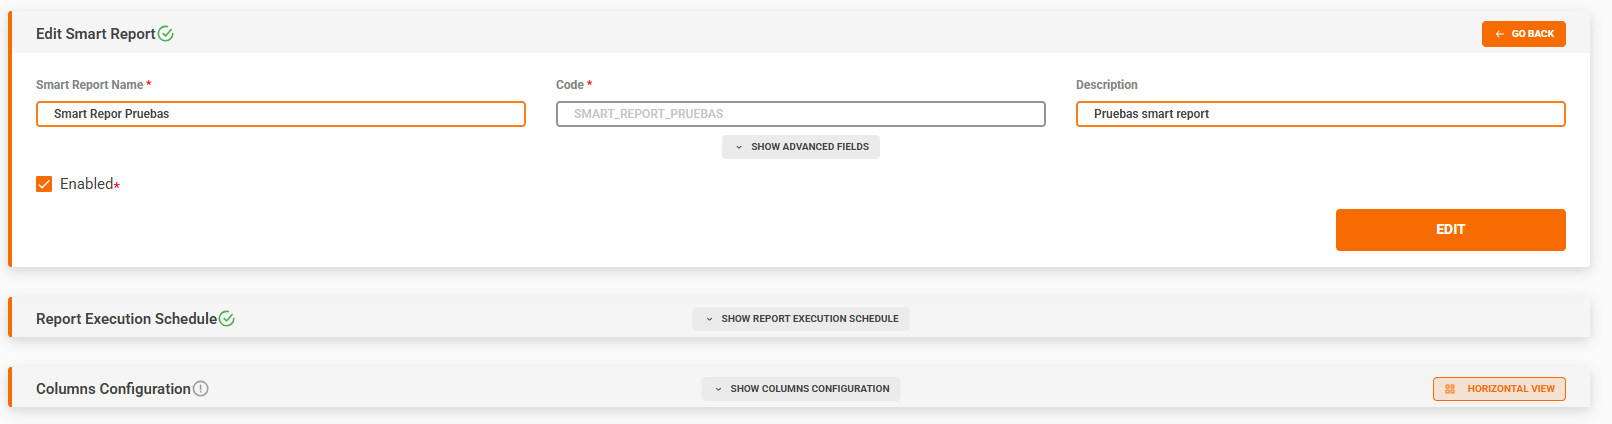
Page Structure
The creation/edit page is divided into three main sections:
-
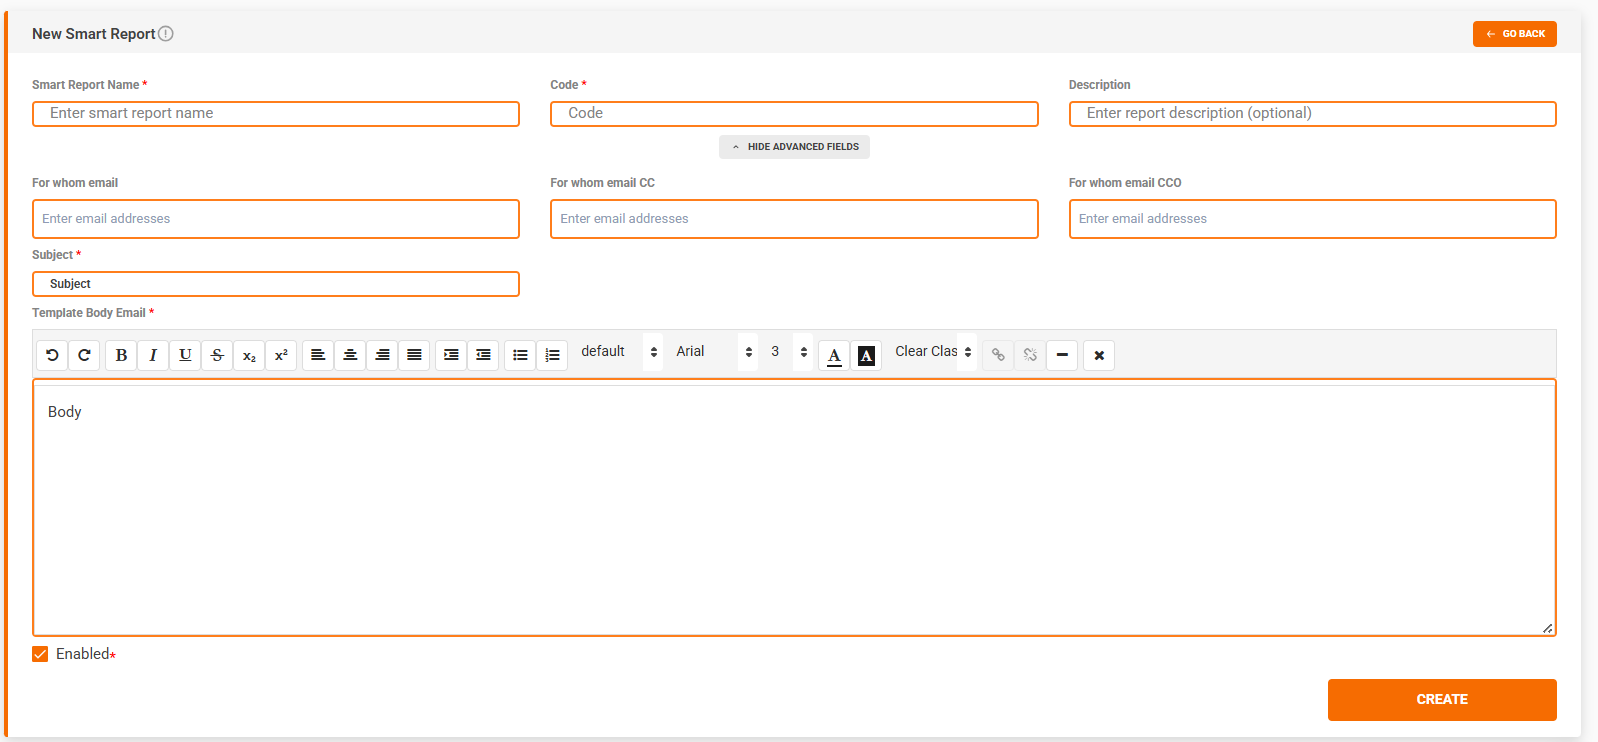
Basic Report Information (Top section)
- Name, Code, Description
- Advanced fields (emails, subject, body)
- Enabled toggle
-
Report Execution Schedule (Middle section)
- Only visible after saving the report for the first time
- Configure automated report execution
-
Columns Configuration (Bottom section)
- Select columns to include
- Configure filters for each column
- Save configuration
Status Indicators
At the top of the page, you'll see status icons:
- ✅ Green checkmark: Configuration is saved and complete
- ✏️ Orange edit icon: There are unsaved changes
- ⚠️ Red alert icon: Configuration is not complete
These indicators appear for:
- Report Status: Overall report configuration
- Columns Configuration Status: Columns and filters setup
Basic Configuration
Required Fields (Marked with *)
1. Smart Report Name
- Purpose: Display name for the report
- Example: "Monthly Sales Report"
- Tip: Use a descriptive name that clearly identifies the report's purpose
2. Code
- Purpose: Unique identifier for the report
- Format: Only capital letters, numbers, and underscore
- Example: "MONTHLY_SALES_REPORT_01"
- Important Notes:
- Automatically converted to uppercase
- Cannot be changed after creation
- Must be unique

3. Description
- Purpose: Additional information about the report
- Required: No
- Example: "Monthly sales report for all regions"
- Tip: Add helpful context about what the report contains

Advanced Fields (Collapsible Section)
Click "Show Advanced Fields" to expand/collapse this section.
Email Configuration
For whom email
- Purpose: Primary email recipients (To field)
- Format: Multiple emails separated by commas
- Example: "manager@company.com, analyst@company.com"
- Important: At least one email is required to use the "Send Email" button
For whom email CC
- Purpose: Carbon copy recipients
- Format: Multiple emails separated by commas
- Required: No
For whom email CCO
- Purpose: Blind carbon copy recipients
- Format: Multiple emails separated by commas
- Required: No
Email Template
Subject
- Purpose: Email subject line
- Required: Yes
- Example: "Monthly Sales Report - [Month] [Year]"
- Tip: Make the subject clear and descriptive
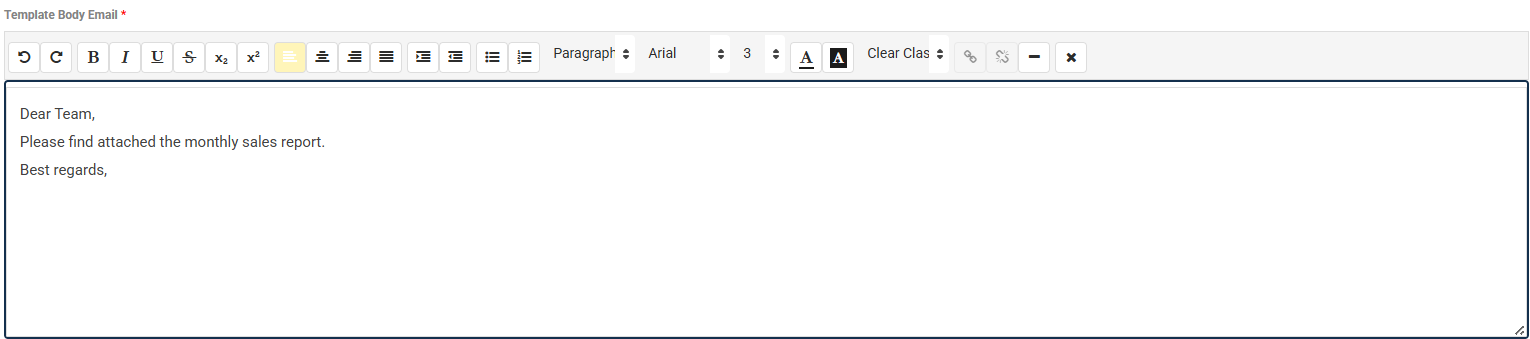
Template Body Email
- Purpose: Email body content
- Required: Yes
- Default: Body
- Example:
Dear Team,
Please find attached the monthly sales report.
Best regards,
Enabled Toggle
- Purpose: Activate or deactivate the report
- Default: Checked (enabled)
- Note: Disabled reports won't execute on schedule
CREATE/EDIT Button
- Location: Bottom right of the basic configuration section
- Label:
- "CREATE" for new reports
- "EDIT" for existing reports
- State:
- Enabled when all required fields are filled
- Disabled when validation fails
- Tooltip: Shows helpful messages when disabled
Saving Basic Configuration
When you click "CREATE" or "EDIT":
- System validates all required fields
- If validation fails, error messages appear
- If validation passes, a confirmation dialog appears
- After confirmation, the report is saved
- Important: After first save, the report enters "edit mode"
- Code field becomes disabled (cannot be changed)
- Report Execution Schedule section becomes visible
- Columns Configuration can now be saved
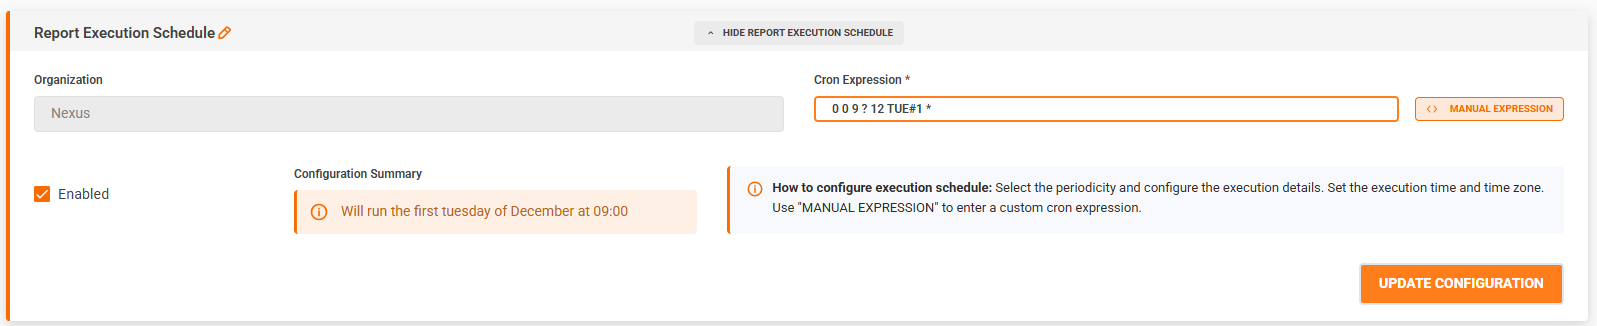
Report Execution Schedule
Overview
The Report Execution Schedule allows you to configure automated report generation and email sending at specified intervals. This feature is only available after the report has been created (in edit mode).

Accessing the Schedule Configuration
- Create and save the basic report information (click "CREATE")
- The "Report Execution Schedule" section appears below the basic configuration
- Click "Show Report Execution Schedule" to expand the configuration panel
Schedule Status Indicator
The schedule section shows a status icon:
- ✅ Configured: Schedule is saved and active
- ✏️ Modifying: Schedule has unsaved changes
- ⚠️ Not Configured: No schedule has been set up
Configuration Options
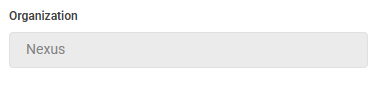
Organization Display
- Shows: Current organization name
- Purpose: Indicates which organization the schedule applies to
- Note: Automatically set to your current organization
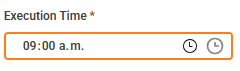
Execution Time
- Purpose: Time of day when the report should execute
- Format: 24-hour format (e.g., 09:00, 14:30)
- Default: 09:00
- Example: "09:00" means the report runs at 9:00 AM
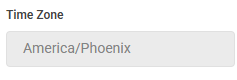
Time Zone
- Source: Automatically obtained from your organization settings
- Purpose: Timezone for schedule execution
- Note: Cannot be manually changed
Periodicity Selection
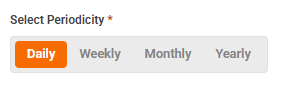
Choose how often the report should run:
Daily
- Description: Report runs every day
- Configuration:
- Select days of the week (Monday through Sunday)
- Can select multiple days
- Default: All days selected
- Use Case: Daily reports, weekday-only reports
Weekly
- Description: Report runs on specific days each week
- Configuration:
- Select one or more days of the week
- Default: Tuesday
- Use Case: Weekly summaries, specific weekday reports
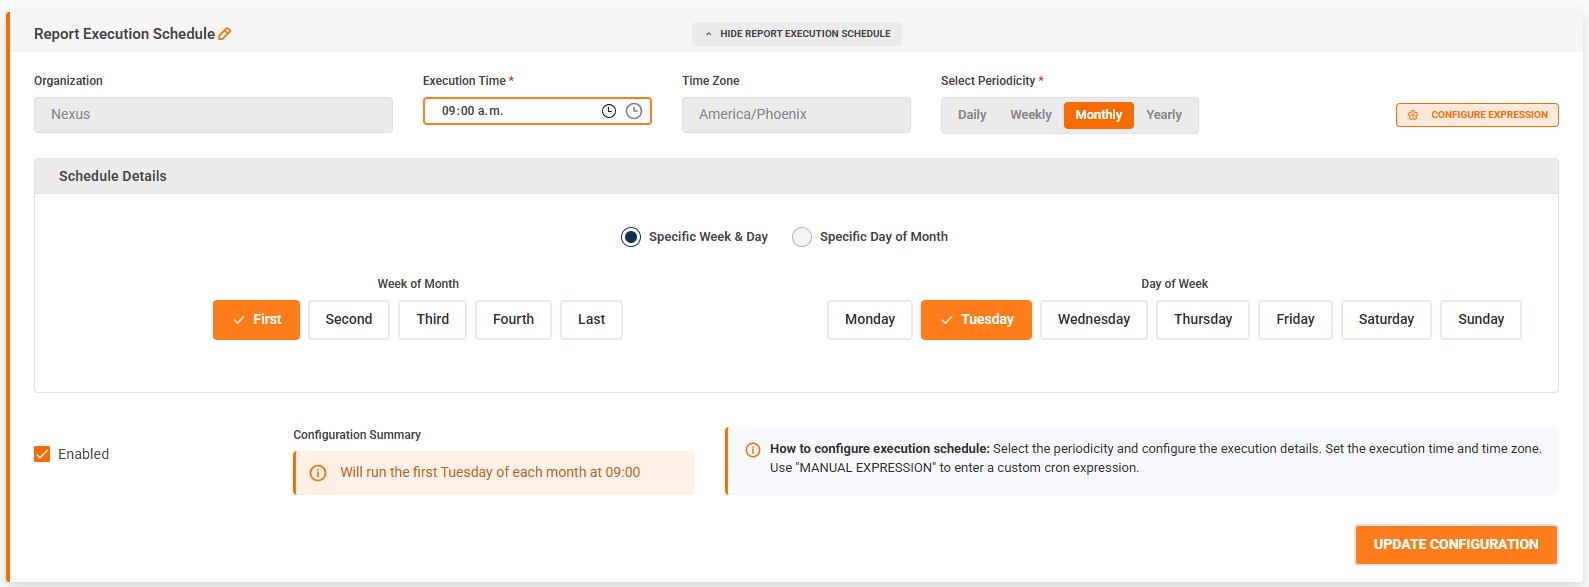
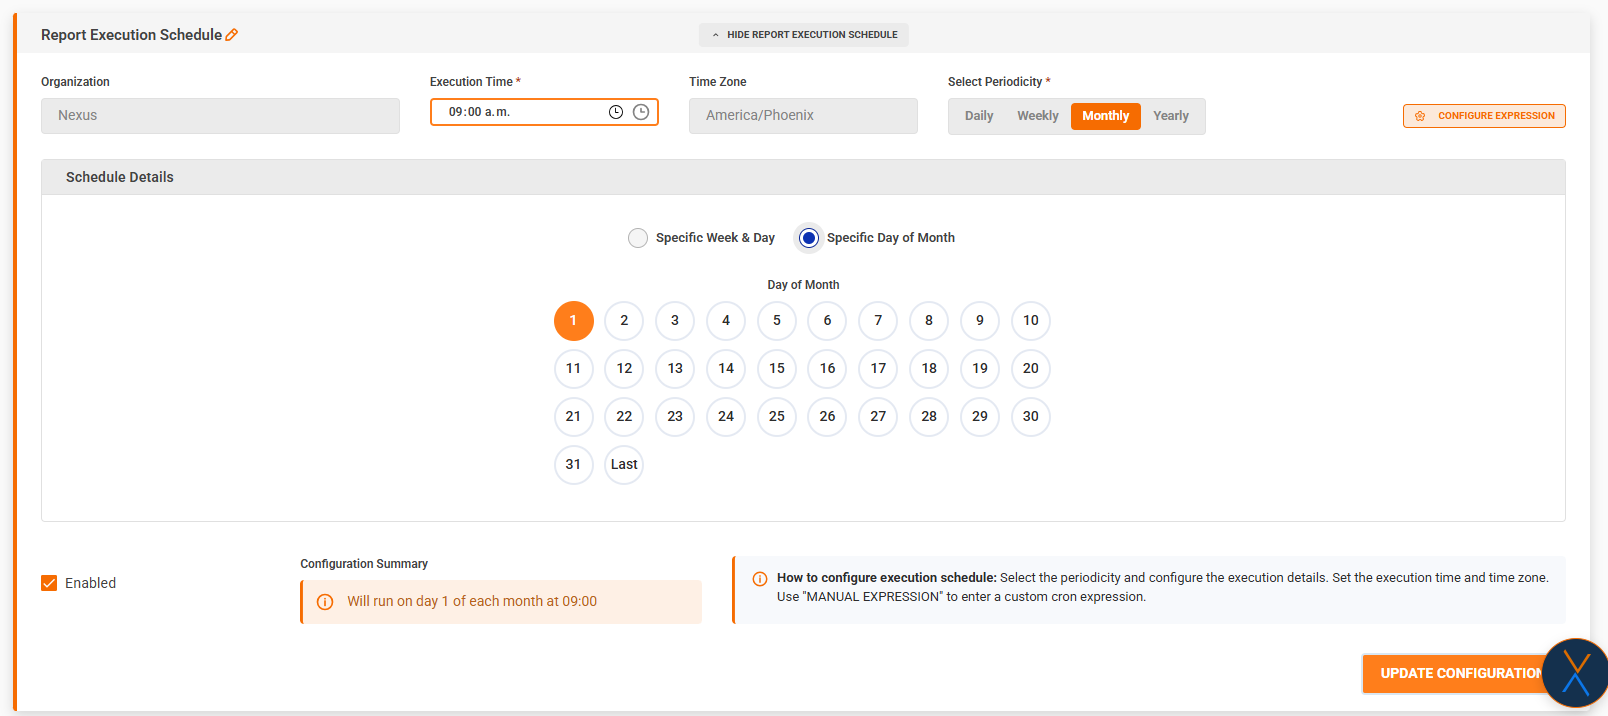
Monthly
-
Description: Report runs on specific days or weeks of each month
-
Configuration Modes:
Mode 1: Specific Week & Day
- Select week of month (First, Second, Third, Fourth, Last)
- Select day of week (Monday through Sunday)
- Can select multiple combinations
- Example: "First Monday" or "Last Friday"
Mode 2: Specific Day of Month
- Select specific day(s) of the month (1-31)
- Can select "Last" for the last day of the month
- Can select multiple days
- Example: "Day 1" or "Day 15 and Last"
-
Use Case: Monthly reports, end-of-month reports
|
|
|
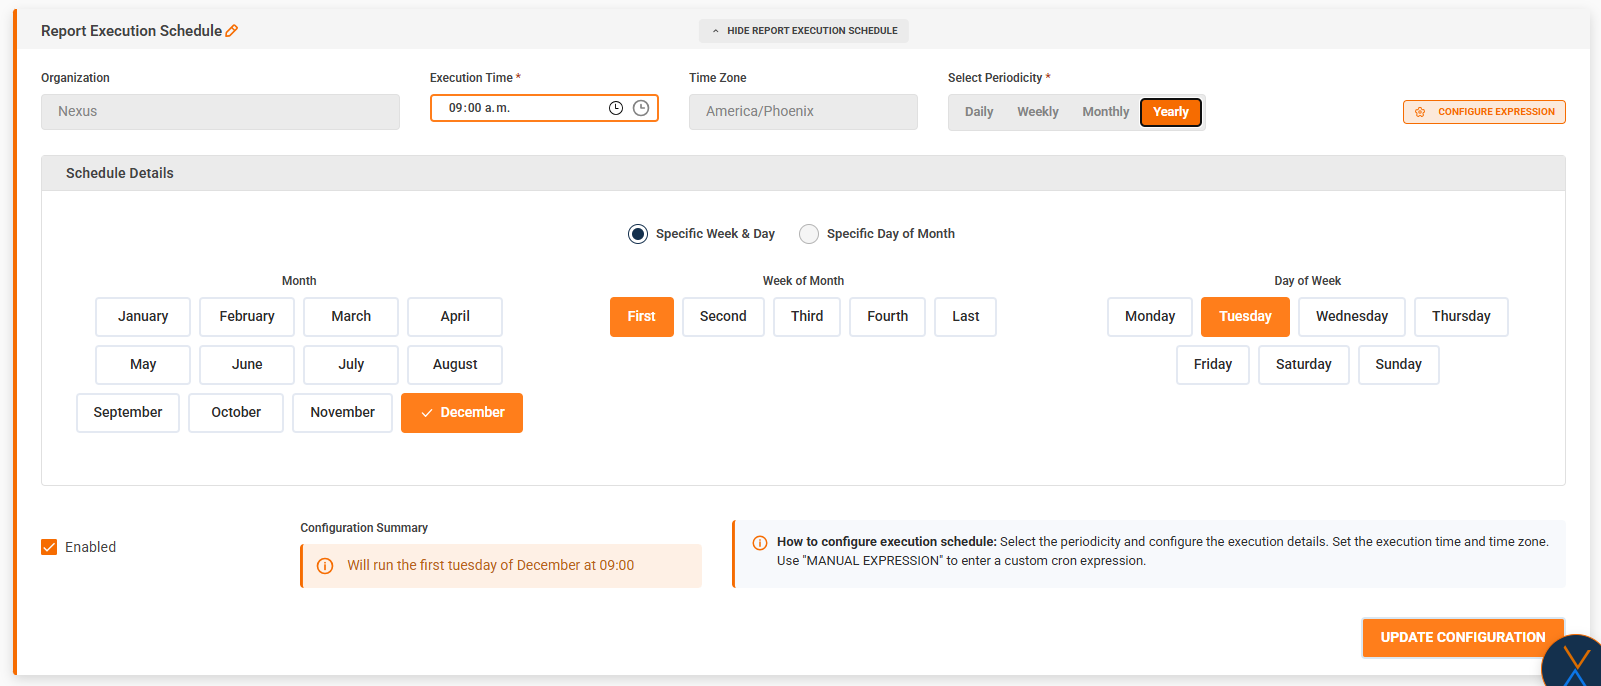
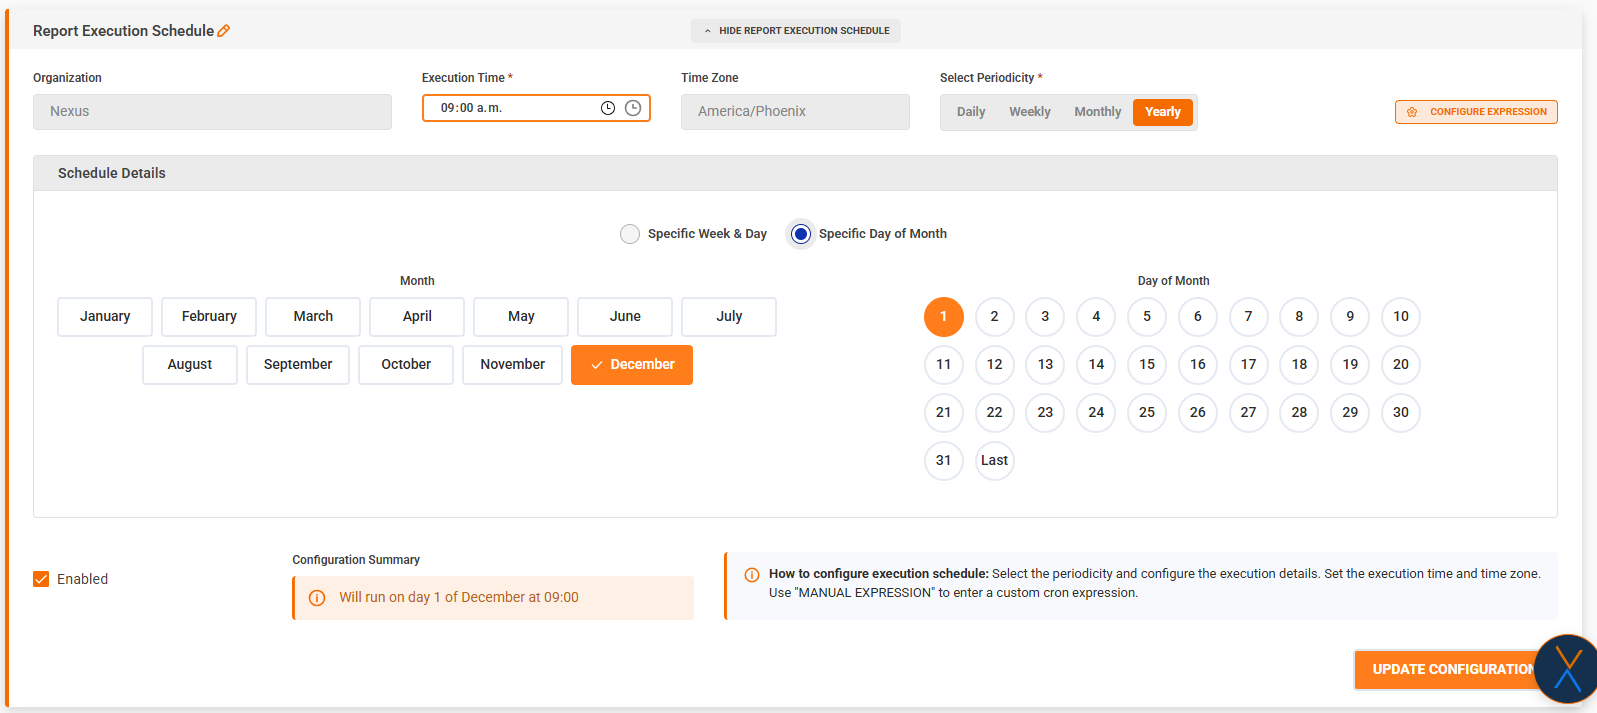
Yearly
-
Description: Report runs on specific dates each year
-
Configuration Modes:
Mode 1: Specific Week & Day
- Select month(s) (January through December)
- Select week of month (First, Second, Third, Fourth, Last)
- Select day of week (Monday through Sunday)
- Example: "First Monday of December"
Mode 2: Specific Day of Month
- Select month(s) (January through December)
- Select specific day(s) of the month (1-31 or Last)
- Can select multiple months and days
- Example: "January 1" or "December 25"
-
Use Case: Annual reports, quarterly reports, specific date reports
|
|
|
Manual Cron Expression
For advanced users, you can enter a cron expression directly.
How to Switch:
- Click "MANUAL EXPRESSION" button
- Enter cron expression in the text field
- Click "CONFIGURE EXPRESSION" to switch back to visual mode
Note: When switching back to visual mode, the system attempts to parse and display your cron expression in the visual interface.
Enabled Toggle
- Purpose: Enable or disable the scheduled execution
- Default: Unchecked (disabled)
- Note:
- Even if configured, the schedule won't run if disabled
- The schedule must be valid and enabled to execute
Configuration Summary
The schedule section displays a summary of your configuration:
- Format: Human-readable description
- Example: "Will run every day at 09:00"
- Example: "Will run the first Monday of each month at 09:00"
- Updates: Automatically updates as you change settings

Saving the Schedule
- Configure all required fields (periodicity, time, etc.)
- Ensure "Enabled" is checked if you want it to run
- Click "SAVE CONFIGURATION" button
- System validates the configuration
- Success message appears
- Status indicator updates to "Configured"
Schedule Behavior
- Execution: Reports are generated and sent via email automatically
- Timezone: Uses your organization's timezone
- Email Recipients: Uses emails configured in "For whom email" fields
- Report Generation: Happens automatically at the scheduled time
- No Manual Action Required: The report file is generated and attached automatically
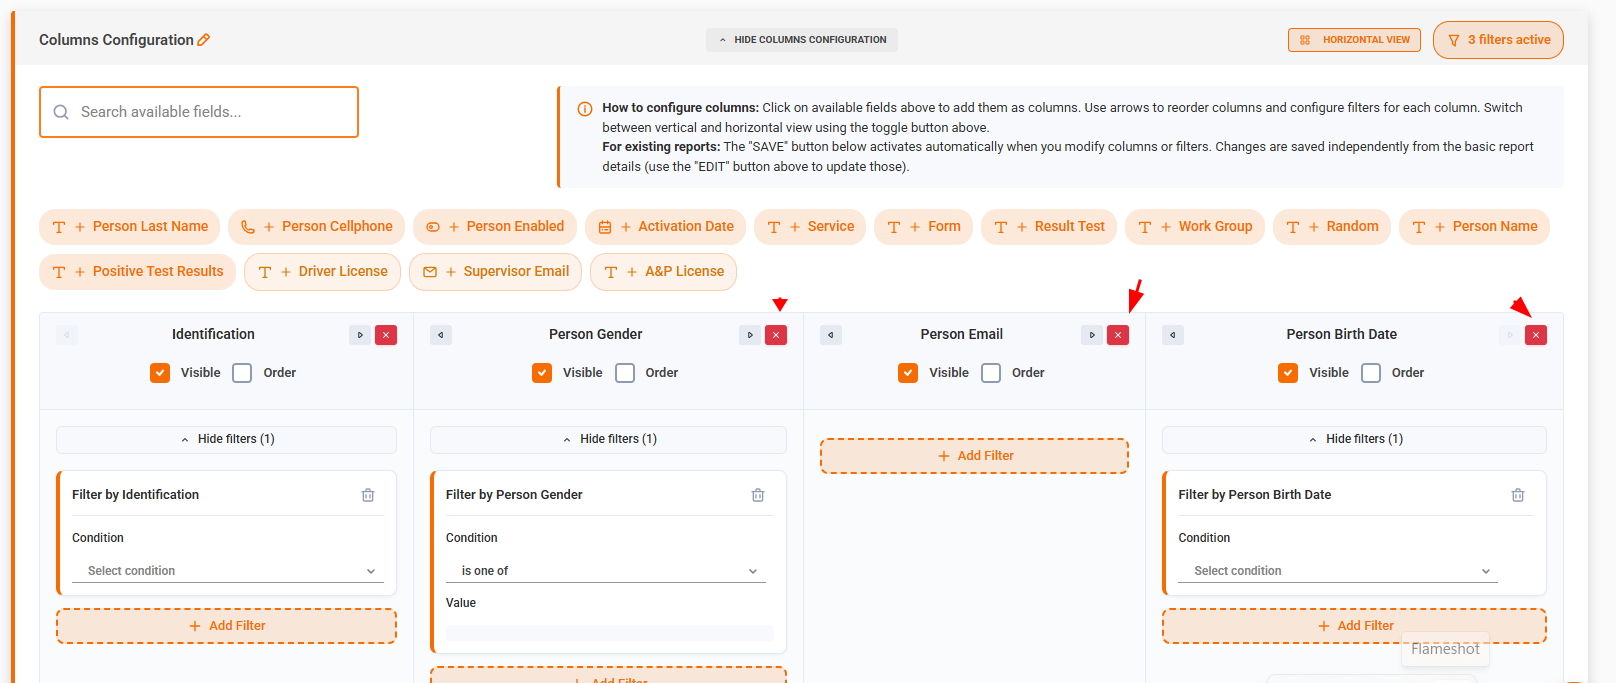
Columns Configuration
Overview
The Columns Configuration section allows you to:
- Select which data fields (columns) to include in the report
- Configure display options for each column
- Set up filters to narrow down the data
- Reorder columns
- Save the configuration
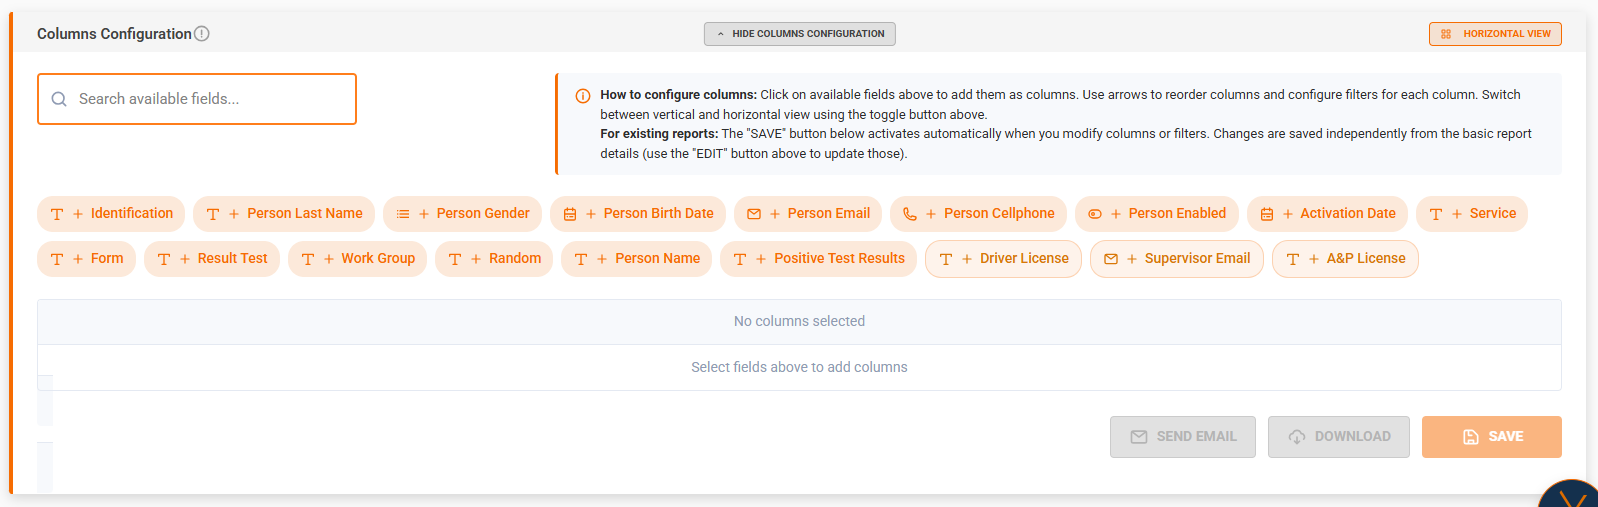
Accessing Columns Configuration
- The "Columns Configuration" section is always visible
- Click "Show Columns Configuration" to expand
- The section shows:
- Search bar for available fields
- Available fields (chips)
- Selected fields table
- Action buttons
Status Indicator
- ✅ Configured: Columns are saved
- ✏️ Modifying: Columns have unsaved changes
- ⚠️ Not Configured: No columns selected
Available Fields
Field Search
- Location: Top of the columns section
- Purpose: Filter available fields by name
- How to Use: Type in the search box to filter
- Tip: Use this to quickly find the fields you need

Field Chips
Available fields are displayed as clickable chips:
- Appearance:
- Icon representing field type
- Plus icon (+)
- Field display name
- Special Fields: Some fields have special styling (custom fields, notes)
- Action: Click a chip to add it as a column
Field Types
Fields can be of different types:
- Text: Textual data
- Number: Numeric data
- Date: Date/time data
- Boolean: True/false values
- Select: Predefined options
Selected Fields Table
View Modes
You can switch between two view modes:
Vertical View (Default)
- Layout: Fields as columns (table columns)
- Best For: Seeing all fields at once
- Toggle: Click "Horizontal view" button to switch
Horizontal View
- Layout: Fields as rows (table rows)
- Best For: Detailed configuration of each field
- Toggle: Click "Vertical view" button to switch
Field Management
For each selected field, you can:
Reorder Fields
- Vertical View:
- Left arrow (←): Move field one position left
- Right arrow (→): Move field one position right
- Horizontal View:
- Up arrow (↑): Move field one position up
- Down arrow (↓): Move field one position down
- Note: Order determines column order in the exported report
Remove Field
Field Options (Checkboxes)
Depending on the field type, you may see these options:
Group
- Purpose: Group data by this column in the report
- Available: Only if field supports grouping
Visible
- Purpose: Show/hide this column in the report
- Default: Checked (visible)
- Available: Only if field supports visibility toggle
Multivalue
- Purpose: Allow multiple values for this column
- Available: Only if field supports multiple values
Order
- Purpose: Enable sorting by this column
- Behavior: Only one field can have ordering enabled at a time
- Available: Only if field supports ordering
- Note: Selecting order on a new field automatically deselects it on the previous field
Filters Configuration
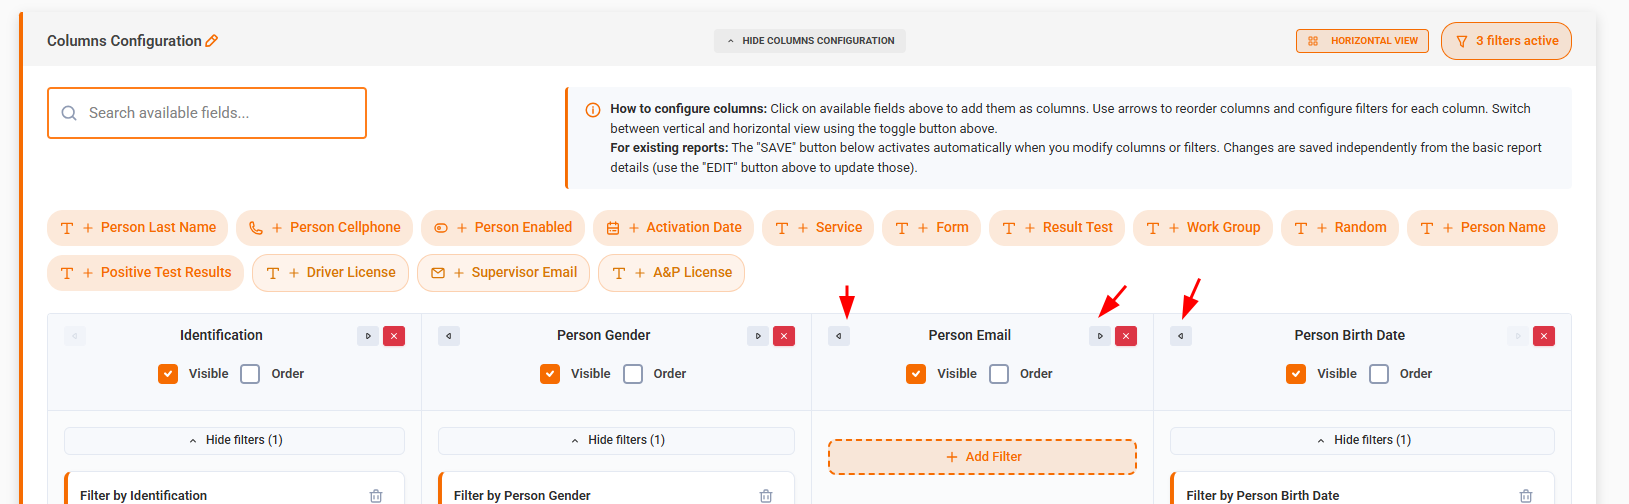
Adding a Filter
- Find the field you want to filter
- Click "Add Filter" button (only visible if field supports filtering)
- A filter card appears
- Configure the filter (see below)
Filter Card
Each filter has:
Filter Header
- Title: "Filter by [Field Name]"
- Remove Button: Trash icon to delete the filter
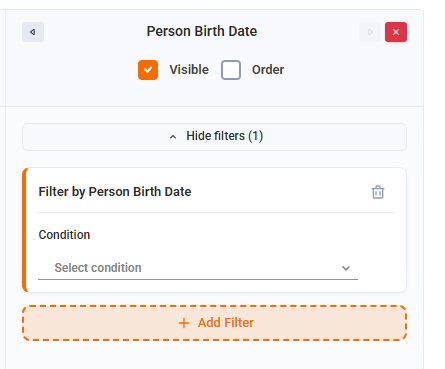
Filter Configuration
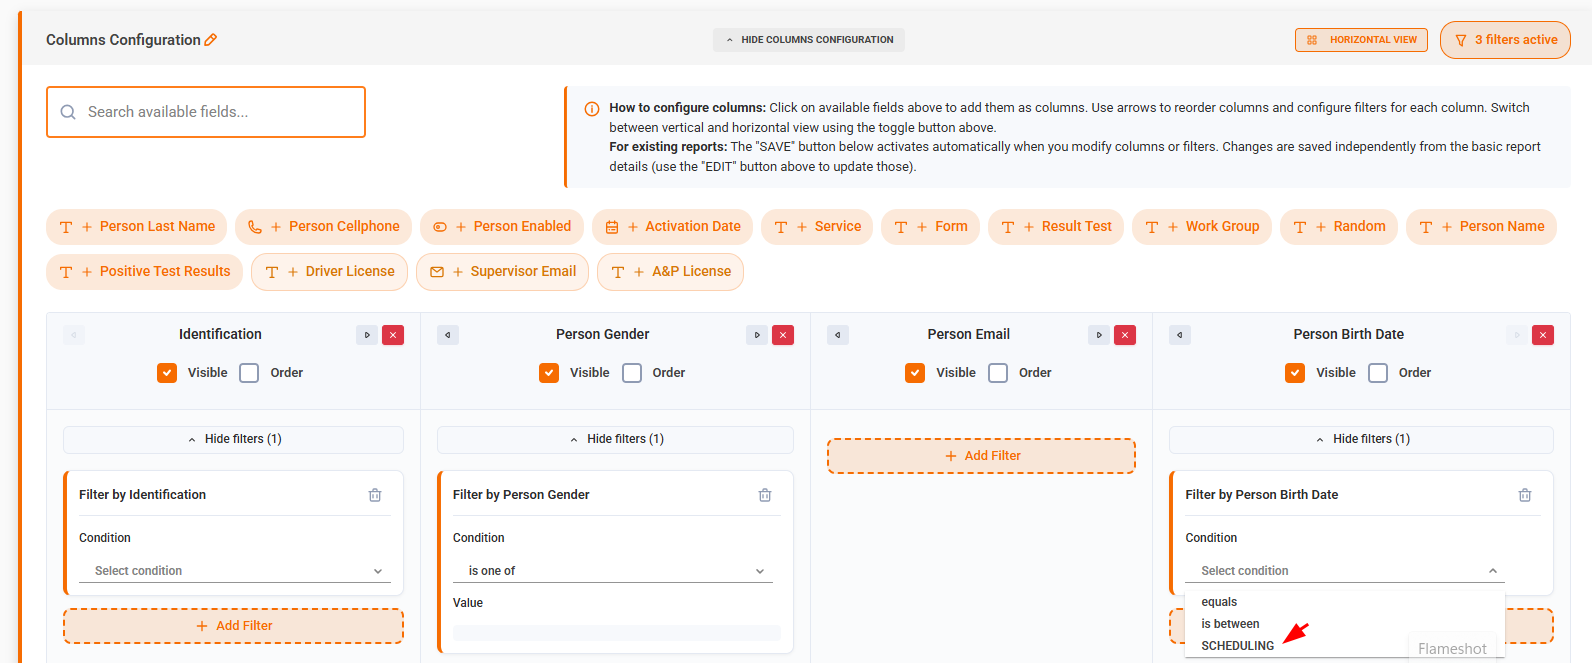
Condition (Operator)
- Field: Dropdown select
- Options: Depends on field type
- Text: equals, not equals, contains, does not contain, is null, is not null
- Number: equals, not equals, greater than, less than, greater than or equal, less than or equal, is between, is null, is not null
- Date: equals, greater than, less than, is between, is null, is not null, SCHEDULING (special dynamic filter)
- Boolean: equals
- Select: is one of, is not one of
- Required: Yes
Value
- Format: Depends on condition and field type
- Text: Text input
- Number: Number input (single value or range)
- Date: Date picker (single date or date range)
- Boolean: Checkbox (Yes/No)
- Select: Multiple checkboxes (select one or more options)
- Special Cases:
- Is between: Requires two values (From and To)
- Is one of / Is not one of: Requires selecting one or more options
- Is null / Is not null: No value required
- SCHEDULING: Opens special configuration modal (see Scheduling Filters section)
Filter Validation
Filters are validated when saving:
- Required fields: Condition and value (if required) must be filled
- Invalid filters: Highlighted in red
- Error messages: Displayed for each invalid filter
- Scroll to error: System automatically scrolls to first invalid filter
Expanding/Collapsing Filters
Saving Columns Configuration
Prerequisites
Before saving, ensure:
- At least one column is selected
- All filters are valid (if any are configured)
- Basic report information is saved (for new reports)
Save Process
Save Button States
- Enabled: When there are unsaved changes and configuration is valid
- Disabled:
- When no columns are selected
- When configuration is already saved
- When loading
Help Text
The columns section includes helpful information:
- General: How to add columns, reorder, and configure filters
- For New Reports: Reminder to save basic info first
- For Existing Reports: Information about independent saving
Scheduling Filters
Overview
Scheduling Filters are a special type of filter available only for Date fields. They allow you to create dynamic, time-based filters that automatically adjust based on when the report runs.
When to Use Scheduling Filters
Use Scheduling Filters when you want to:
- Filter data relative to the current date/time
- Create reports that always show "last 7 days" or "current month"
- Automatically adjust date ranges without manual updates
Accessing Scheduling Filter Configuration
- Add a Date field to your columns
- Add a filter for that date field
- In the "Condition" dropdown, select "SCHEDULING"
- Click "Configure" button that appears
- A modal dialog opens with scheduling filter options
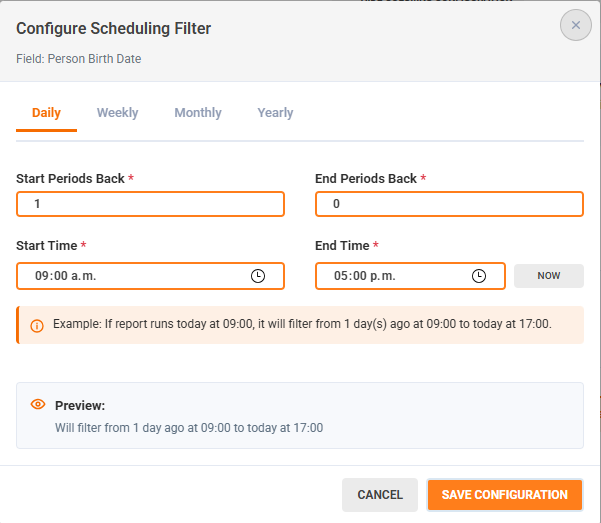
Scheduling Filter Configuration Modal
Modal Header
- Title: "Configure Scheduling Filter"
- Field Name: Shows which field you're configuring
- Close Button: X icon to cancel
Configuration Tabs
The modal has four tabs for different time periods:
Daily Tab
Configure filters based on daily time ranges.
Periods Back
- Start Periods Back: Number of days ago to start the range
- Example: 7 means "7 days ago"
- Must be 0 or greater
- End Periods Back: Number of days ago to end the range
- Example: 0 means "today"
- Must be 0 or greater and less than or equal to Start Periods Back
Time Range
- Start Time: Time of day to start
- Example: 09:00
- Required
- End Time: Time of day to end
- Options:
- Specific time (e.g., 17:00)
- "Now" button: Use current time
- Required
- Must be after Start Time
- Options:
Example:
- Start: 7 days ago at 09:00
- End: Today at current time
- Result: Filters data from 7 days ago at 9 AM to now
Weekly Tab
Configure filters based on weekly day ranges.
Periods Back
- Start Periods Back: Number of weeks ago to start
- End Periods Back: Number of weeks ago to end (0 = current week)
Day Range
- Start Day: Day of week to start (Monday through Sunday)
- End Day: Day of week to end
- Options: Monday through Sunday, or "Today" (current day)
- Must be same or later in week than Start Day
Example:
- Start: 2 weeks ago, Monday
- End: Current week, Today
- Result: Filters data from Monday two weeks ago to today
Monthly Tab
Configure filters based on monthly day ranges.
Periods Back
- Start Periods Back: Number of months ago to start
- End Periods Back: Number of months ago to end (0 = current month)
Day Range
- Start Day: Day of month to start (1-31 or "Last")
- End Day: Day of month to end
- Options: 1-31, "Last", or "Today" (current day)
- Must be same or later in month than Start Day
Example:
- Start: 1 month ago, day 1
- End: Current month, Today
- Result: Filters data from the 1st of last month to today
Yearly Tab
Configure filters based on yearly date ranges.
Periods Back
- Start Periods Back: Number of years ago to start
- End Periods Back: Number of years ago to end (0 = current year)
Month Range
- Start Month: Month to start (January through December)
- End Month: Month to end
- Options: January through December, or "Current" (current month)
- Must be same or later in year than Start Month
Day Range
- Start Day: Day of month to start (1-31 or "Last")
- End Day: Day of month to end
- Options: 1-31, "Last", or "Today" (current day)
Example:
- Start: 1 year ago, January 1
- End: Current year, Current month, Today
- Result: Filters data from January 1 of last year to today
Time Zone
- Field: Automatically set
- Source: Your organization's timezone settings
- Purpose: Timezone for filter calculations
- Note: Cannot be manually changed
Preview Section
- Location: Bottom of modal
- Shows: Human-readable description of the filter
- Updates: Automatically as you change settings
- Example: "Will filter from 7 day(s) ago at 09:00 to today at current time"
Validation
The modal validates:
- Periods Back must be 0 or greater
- Start Periods Back must be greater than or equal to End Periods Back
- Time ranges must be valid (start before end)
- Day ranges must be valid (start before or equal to end)
- Month ranges must be valid (start before or equal to end)
Saving the Filter
- Configure all required fields
- Review the preview
- Click "Save Configuration"
- Modal closes and filter is saved
- Filter card shows "Scheduling filter configured" message
Canceling
- Click "Cancel" or X button
- Any unsaved changes are discarded
- Returns to previous filter state
Using Scheduling Filters with Execution Schedule
Scheduling Filters work independently of Report Execution Schedule:
- Scheduling Filter: Determines which data to include (date range)
- Execution Schedule: Determines when to run the report
Combined Example:
- Execution Schedule: Run every Monday at 9 AM
- Scheduling Filter: Last 7 days
- Result: Every Monday at 9 AM, the report includes data from the previous 7 days
Workflow Scenarios
This section describes the complete workflows for different use cases.
Scenario 1: Create a Normal Report
Goal: Create a basic report without scheduling or dynamic filters.
Steps:
Result: A report that can be downloaded or sent manually, but won't run automatically.
Scenario 2: Create Report with Execution Schedule
Goal: Create a report that automatically runs and sends emails on a schedule.
Steps:
-
Create Basic Report (Steps 1-2 from Scenario 1)
-
Configure Columns (Step 3 from Scenario 1)
-
Configure Execution Schedule
- Click "Show Report Execution Schedule"
- Select Periodicity: "Monthly"
- Choose mode: "Specific Day of Month"
- Select day: "1" (first of month)
- Set Execution Time: "09:00"
- Check "Enabled"
- Click "SAVE CONFIGURATION"
-
Configure Email Recipients
- Click "Show Advanced Fields"
- Enter "For whom email": "manager@company.com"
- Enter Subject: "Monthly Sales Report"
- Enter Template Body: HTML email content
- Click "EDIT" to save email configuration
Result: Report automatically generates and sends via email on the 1st of each month at 9 AM.
Scenario 3: Create Report with Scheduling Filter
Goal: Create a report with dynamic date filtering that adjusts automatically.
Steps:
-
Create Basic Report (Steps 1-2 from Scenario 1)
-
Configure Columns
- Add a Date field (e.g., "Order Date")
- Click "Add Filter" for that field
- Select Condition: "SCHEDULING"
- Click "Configure"
-
Configure Scheduling Filter
- Select tab: "Daily"
- Start Periods Back: 7
- End Periods Back: 0
- Start Time: 09:00
- End Time: Click "Now" (or enter specific time)
- Review preview
- Click "Save Configuration"
-
Save Columns Configuration
- Click "Save" in Columns Configuration
Result: Report always shows data from the last 7 days, regardless of when it's run.
Scenario 4: Create Report with Both Scheduling Filter and Execution Schedule
Goal: Combine dynamic filtering with automated execution.
Steps:
-
Create Basic Report (Steps 1-2 from Scenario 1)
-
Configure Columns with Scheduling Filter
- Add Date field
- Add SCHEDULING filter (as in Scenario 3, Step 2-3)
- Save Columns Configuration
-
Configure Execution Schedule
- Set up schedule (as in Scenario 2, Step 3)
-
Configure Email Recipients
- Set up emails (as in Scenario 2, Step 4)
Result: Report automatically runs on schedule, always including the last 7 days of data, and sends via email.
Example:
- Execution Schedule: Every Monday at 9 AM
- Scheduling Filter: Last 7 days
- Result: Every Monday, the report includes the previous week's data and is emailed automatically.
Scenario 5: Create Report and Send Email Directly
Goal: Create a report and send it immediately via email without scheduling.
Steps:
-
Create Basic Report
- Fill all required fields
- Click "CREATE"
-
Configure Columns
- Select columns
- Add filters if needed
- Click "Save"
-
Configure Email Recipients
- Click "Show Advanced Fields"
- Enter "For whom email": "recipient@company.com"
- Optionally add CC and BCC
- Enter Subject and Body
- Click "EDIT" to save
-
Send Email
- Ensure report is saved (no unsaved changes)
- Ensure at least one email in "For whom email"
- Click "Send Email" button
- Confirm success message
Result: Report is generated and sent immediately via email to specified recipients.
Note: The "Send Email" button is only enabled when:
- Report is saved
- Columns are configured and saved
- At least one email is in "For whom email"
- No unsaved changes exist
Validations and Restrictions
General Validations
Required Fields
- Name: Cannot be empty
- Code: Cannot be empty, must be unique
- Subject: Cannot be empty
- Template Body Email: Cannot be empty
Field Length Limits
- Subject: Has a maximum character limit
- Template Body Email: Has a maximum character limit
- Description: Has a maximum character limit (if provided)
Code Format
- Only uppercase letters (A-Z)
- Numbers (0-9)
- Underscore (_)
- No spaces or special characters
- Automatically converted to uppercase
Download Restrictions
You CANNOT download a report when:
-
Report not saved
- Message: "Please save the report first before downloading."
-
No columns configured
- Message: "Please add at least one column to download."
-
Unsaved changes exist
- Message: "You have unsaved changes. Please save changes before downloading."
- Applies to:
- Unsaved column/filter changes
- Unsaved basic information changes
-
Report status is INCOMPLETE
- Download button doesn't appear in the list
- Report must have at least one column configured and saved
Email Send Restrictions
You CANNOT send email when:
-
Any download restriction applies (see above)
- Must be able to download first
-
No email recipients
- Message: "Please add at least one email in For whom email field"
- At least one email must be in "For whom email"
-
Report not fully configured
- All configurations must be saved
Columns Configuration Restrictions
You CANNOT save columns when:
-
No columns selected
- Error: "Please configure at least one column before saving."
-
Invalid filters
- All filters must have:
- Valid condition selected
- Valid value (if required)
- Error shows which filters are invalid
- System scrolls to first invalid filter
- All filters must have:
-
Basic report not saved (for new reports)
- Must click "CREATE" first
- Then can save columns configuration
Execution Schedule Restrictions
You CANNOT save schedule when:
-
Missing required fields
- Execution Time: Required
- Periodicity: Required
- Periodicity-specific fields: Required based on selection
-
Invalid configuration
- Time format must be correct
- At least one day/week/month must be selected
- Manual cron must be valid
-
Report not in edit mode
- Schedule configuration only available after report is created
Filter Restrictions
Filter-specific validations:
-
Is between (date/number)
- Requires both "From" and "To" values
- "From" must be before or equal to "To"
-
Is one of / Is not one of (select fields)
- Requires at least one option selected
-
Is null / Is not null
- No value required
- Value field is hidden
-
SCHEDULING
- Must click "Configure" and save configuration
- Cannot be used without configuration
Permission Restrictions
Actions require specific permissions:
- Create Report: Requires permission to create
- Edit Report: Requires permission to edit
- Delete Report: Requires permission to delete
- Duplicate Report: Requires permission to create
If permission denied:
Status-Based Restrictions
INCOMPLETE reports:
- Cannot be downloaded (button hidden)
- Cannot be duplicated (button hidden)
- Can be edited
- Can be deleted
COMPLETE/PARTIAL reports:
- All actions available (based on permissions)
Download and Email Functionality
Download Report
When Available
- Report is saved
- At least one column is configured and saved
- No unsaved changes
- Report status is not INCOMPLETE
How to Download
From List Page:
- Find the report in the list
- Click "Download" button in Options column
- File downloads automatically
- Success message appears
From Edit Page:
- Ensure report is saved and configured
- Click "Download" button (bottom of Columns Configuration)
- File downloads automatically
- Success message appears
File Details
- Format: Excel file
- Naming: Includes report name and date/time
- Generation: Happens automatically with current data
- Content: Based on configured columns and active filters
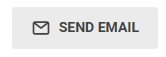
Send Report by Email
When Available
- All download requirements met (see above)
- At least one email in "For whom email" field
- No unsaved changes
How to Send
-
Configure Email Recipients
- Click "Show Advanced Fields"
- Enter "For whom email" (required)
- Optionally add CC and BCC
- Enter Subject and Body
- Click "EDIT" to save
-
Send Email
- Click "Send Email" button
- Button shows "Sending..." while processing
- Success message appears with details
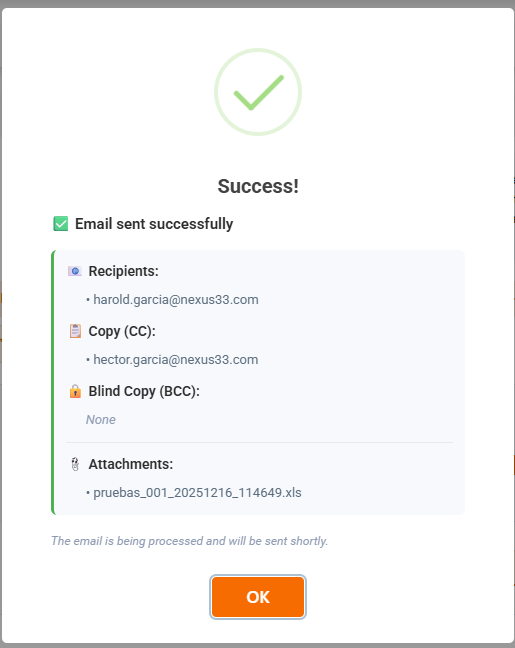
Email Details
Recipients:
- To: Emails from "For whom email" field
- CC: Emails from "For whom email CC" field (if provided)
- BCC: Emails from "For whom email CCO" field (if provided)
Email Content:
- Subject: From "Subject" field
- Body: HTML content from "Template Body Email" field
- Attachment: Report file (generated automatically)
- Format: Excel file
- Name: Includes report name and date/time
Success Message: Shows detailed information:
- ✅ Email sent successfully
- 📧 Recipients: List of To emails
- 📋 Copy (CC): List of CC emails
- 🔒 Blind Copy (BCC): List of BCC emails
- 📎 Attachments: Report file name
- Note: "The email is being processed and will be sent shortly."
Email Processing
- Email is queued for sending
- Report is generated automatically
- File is attached automatically
- Email is sent to all recipients
- No manual file upload required
Button States
Download Button
- Enabled: When all requirements met
- Disabled: When restrictions apply
- Tooltip: Shows reason if disabled
- Loading: Shows "Downloading..." when processing
Send Email Button
- Enabled: When all requirements met (including email)
- Disabled: When restrictions apply
- Tooltip: Shows reason if disabled
- Loading: Shows "Sending..." when processing
Editing and Duplicating Reports
Editing a Report
Accessing Edit Mode
From List Page:
- Find the report in the list
- Click "Edit" button in Options column
- Edit page opens with existing data

What Can Be Edited
Can Be Changed:
- Name
- Description
- Subject
- Template Body Email
- Email recipients (To, CC, BCC)
- Enabled status
- Columns configuration
- Filters
- Execution Schedule
Cannot Be Changed:
- Code (disabled after creation)
Edit Process
-
Modify Fields
- Change any editable field
- Status indicator shows "Modifying" when changes exist
-
Save Changes
- Click "EDIT" button for basic info
- Click "Save" for columns configuration
- Click "SAVE CONFIGURATION" for execution schedule
- Each section saves independently
-
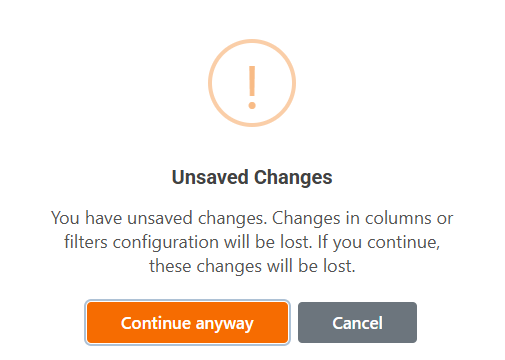
Unsaved Changes Warning
- If you try to go back with unsaved changes
- Warning dialog appears
- Options: "Continue anyway" or "Cancel"
Status Updates
After editing:
- Status may change based on configuration
- INCOMPLETE → COMPLETE when columns are added
- Status updates automatically on save
Duplicating a Report
When to Duplicate
Use duplication to:
- Create similar reports with minor changes
- Use existing configuration as a template
- Test variations without modifying original
Duplication Process
From List Page:
- Find the report to duplicate
- Click "Duplicate" button
- Creation page opens with:
- Name: "[Original Name] (Copy)"
- Code: "[Original Code]_COPY"
- Same description
- Same columns configuration
- Same filters
- Same execution schedule
- Same email settings
Note:
- Duplication only works for reports that are not INCOMPLETE
- If configuration loading fails, you can still create the duplicate manually

After Duplication
-
Review Pre-filled Data
- Check all fields
- Modify as needed
-
Update Required Fields
- Change Code (must be unique)
- Update Name if desired
- Modify other fields as needed
-
Save
- Click "CREATE" to save
- New report is created
- Original report remains unchanged
What Gets Duplicated
Duplicated:
- All column selections
- All filter configurations (including SCHEDULING filters)
- Execution schedule settings
- Email configuration
- Description
Not Duplicated:
- Report ID (new ID assigned)
- Code (appended with "_COPY", must be changed)
- Name (appended with " (Copy)", can be changed)
Additional Notes
Best Practices
-
Naming Conventions
- Use descriptive names for reports
- Use consistent code patterns
-
Email Configuration
- Always test email sending with a small group first
- Use clear, descriptive email subjects
- Include context in email body
-
Filter Configuration
- Test filters before saving
- Use SCHEDULING filters for time-based reports
- Validate filter combinations
-
Schedule Configuration
- Consider timezone differences for recipients
- Test schedules with short intervals first
- Monitor initial scheduled executions
-
Column Selection
- Only include necessary columns
- Consider report size and performance
- Use appropriate field options (Group, Visible, etc.)
Support
If you encounter issues not covered in this documentation:
- Check the validation messages and tooltips
- Review the FAQ section
- Contact your system administrator
- Check system logs for error details
Document Version: 1.0
Last Updated: 16 December 2025
Applicable To: Smart Reports Module
No comments to display
No comments to display