# 4. Settings
# Import Employee Configuration
## Overview
The **Import Employee Configuration** feature allows administrators to configure how employee data is mapped and imported from Excel files. This configuration defines which columns in your Excel file correspond to which employee attributes in the system, ensuring accurate data import.
[](https://wiki.nexus33.com/uploads/images/gallery/2026-01/image.png)
---
## Accessing the Feature
1. Navigate to the **Admin** section in the main menu
2. Select **Import Employee** from the admin options
3. Scroll down to the **Import Employee Configuration** card section
---
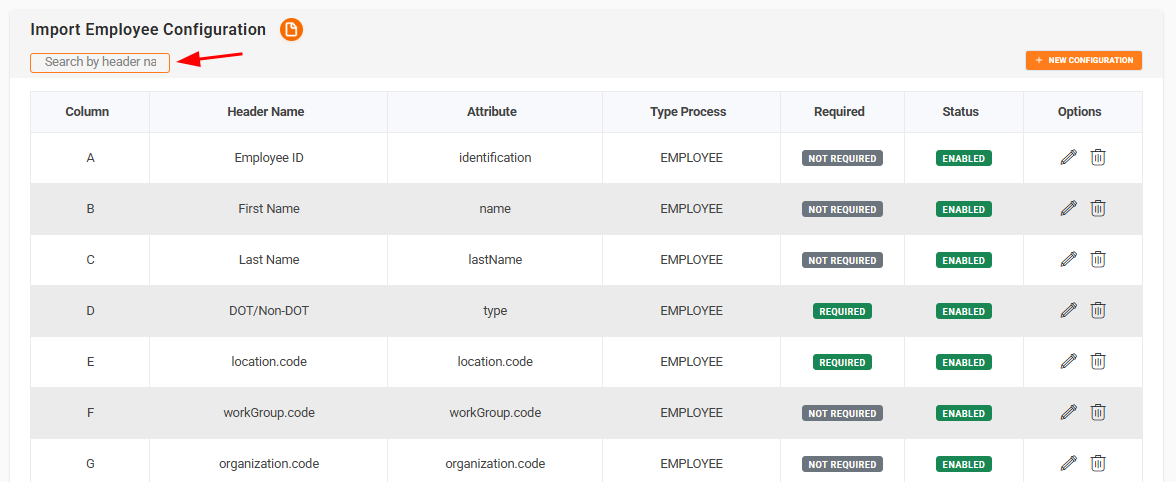
## Configuration List Overview
The configuration list displays all existing import configurations in a table format. Each row represents one configuration that maps an Excel column to an employee attribute.
### Table Columns
[](https://wiki.nexus33.com/uploads/images/gallery/2026-01/9lmimage.png)
#### Column
- **Description**: The Excel column letter (A, B, C, etc.) or "N\_A" if not applicable
- **Display**: Shows the letter identifier that corresponds to the Excel file column
- **Example**: "A", "B", "C", "N\_A"
#### Header Name
- **Description**: The user-friendly name that appears as the column header in the Excel file
- **Display**: The text label that identifies what data this column contains
- **Example**: "Employee ID", "First Name", "Last Name", "Pre-Employment"
#### Attribute
- **Description**: The system attribute name that the Excel column maps to
- **Display**:
- For EMPLOYEE type: Shows the attribute name (e.g., "identification", "name", "location.code")
- For TYPE\_TEST or CUSTOM\_COLUMN: Shows the type test value or custom column code
- **Example**: "identification", "name", "PRE\_EMPLOYMENT", "CUSTOM\_COLUMN\_CODE"
#### Type Process
- **Description**: The type of data processing for this configuration
- **Display**:
- "EMPLOYEE" - Standard employee data fields
- "TYPE TEST" - Drug and alcohol test types
- "CUSTOM COLUMN" - Custom column data
- **Note**: If the value is null in the system, it displays as "EMPLOYEE"
#### Required
- **Description**: Indicates whether this field is mandatory during import
- **Display**:
- **Green badge "REQUIRED"** - Field must be filled in the Excel file
- **Gray badge "NOT REQUIRED"** - Field is optional
- **Purpose**: Helps identify which columns must have data for successful import
#### Status
- **Description**: Whether this configuration is currently active and will be used during import
- **Display**:
- **Green badge "ENABLED"** - Configuration is active and will be processed
- **Red badge "DISABLED"** - Configuration is inactive and will be skipped during import
- **Purpose**: Allows you to temporarily disable configurations without deleting them
#### Options
- **Description**: Actions available for each configuration
- **Actions**:
- **Edit icon (pencil)** - Opens the edit form to modify the configuration
- Tooltip: "Edit configuration"
- **Delete icon (trash)** - Removes the configuration permanently
- Tooltip: "Delete configuration"
- **Note**: Icons are closely spaced for easy access
---
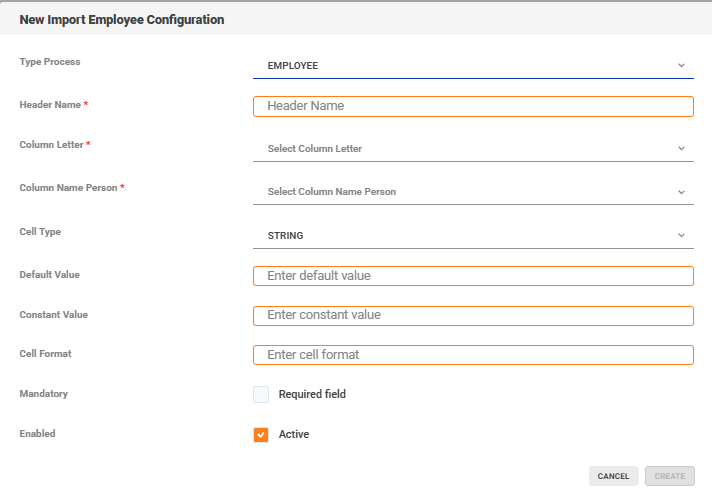
## Search Functionality
[](https://wiki.nexus33.com/uploads/images/gallery/2026-01/7ZUimage.png)
The search bar allows you to quickly find configurations by:
- Header Name
- Column Letter
- Attribute Name
### How to Search
1. Click in the search input field at the top of the configuration table
2. Type your search term (e.g., "Employee ID", "A", "identification")
3. Press **Enter** or wait for automatic filtering
4. The table will show only matching configurations
5. To clear the search, delete all text from the search field
**Tooltip**: "Search configurations by header name, column letter, or attribute"
---
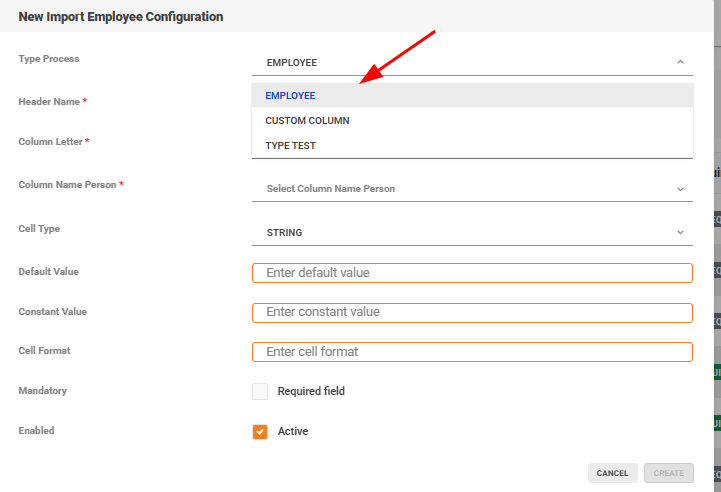
## Creating a New Configuration
[](https://wiki.nexus33.com/uploads/images/gallery/2026-01/bM9image.png)
### Step-by-Step Guide
[](https://wiki.nexus33.com/uploads/images/gallery/2026-01/Vywimage.png)
1. **Click the "New Configuration" button**
- Located at the top right of the configuration table
- Tooltip: "Create a new import employee configuration"
2. **The configuration form modal will open**
- Title: "New Import Employee Configuration"
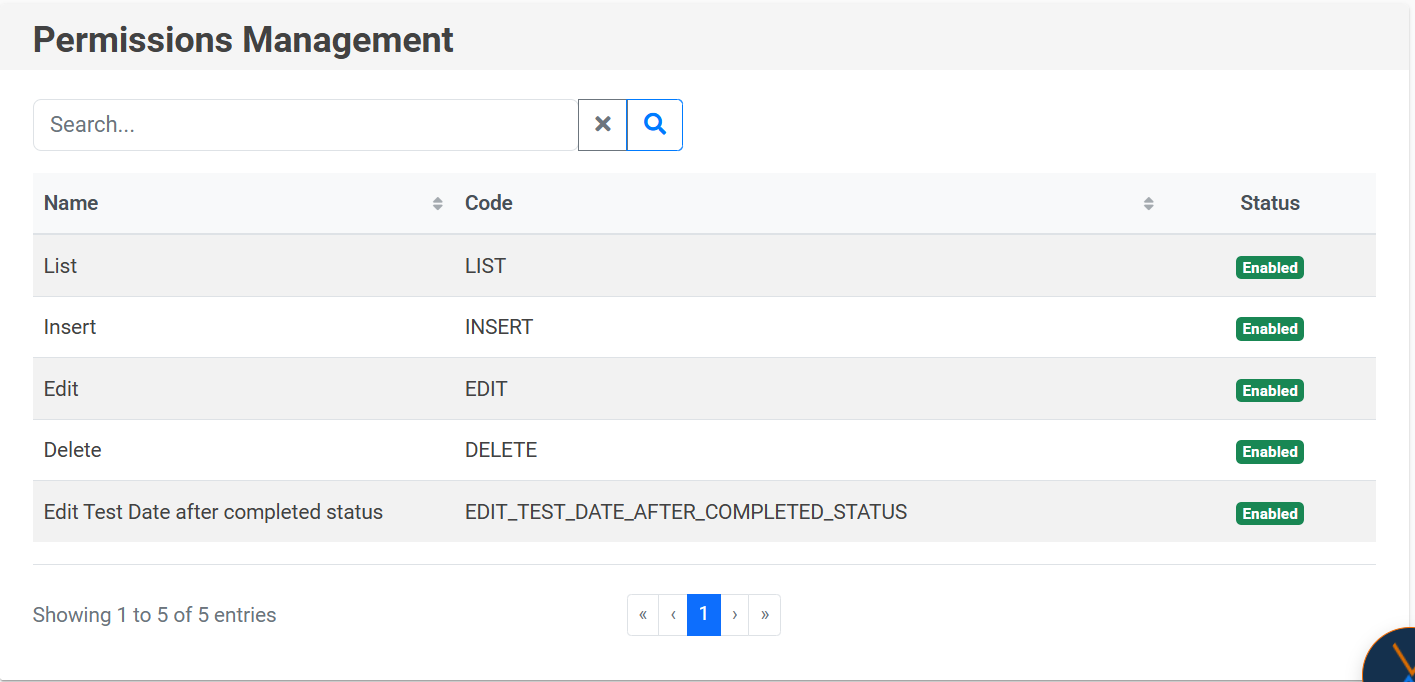
3. **Select Type Process** (First field - Required)
- This determines what type of data this configuration handles
- Options:
- **EMPLOYEE** - Standard employee information (default)
- **TYPE TEST** - Drug and alcohol test types
- **CUSTOM COLUMN** - Custom column data
- [](https://wiki.nexus33.com/uploads/images/gallery/2026-01/hvEimage.png)
4. **Based on Type Process selection, additional fields will appear:**
#### If "TYPE TEST" is selected:
- **Type Test field appears** (Required)
- Select from dropdown:
- Pre Employment
- Post Accident
- Reasonable Susp Cause
- Return To Duty
#### If "CUSTOM COLUMN" is selected:
- **Custom Column field appears** (Required)
- Select from dropdown showing available custom column codes
- Only the custom column name is displayed (not the code)
#### If "EMPLOYEE" is selected (default):
- **Column Name Person field appears** (Required)
- Select from dropdown showing available person fields
- System fields (id, created\_by, etc.) are hidden
- **Attribute Name Entity field appears automatically** (Read-only)
- This field auto-fills based on your Column Name Person selection
- For foreign keys (ending in \_id), it shows the entity.code format
5. **Enter Header Name** (Required)
- The name that appears as the column header in Excel
- Example: "Employee ID", "First Name", "Location Code"
- This is what users will see in their Excel file
6. **Select or Enter Column Letter** (Required)
- **Option 1**: Select from predefined list
- Options include: N\_A, A, B, C, D... Z, AA, AB... AI
- Used letters (except N\_A) are not available
- N\_A is always available
- **Option 2**: Select "Custom..." to enter a custom letter
- Enter letters only (e.g., "HG", "XY")
- Automatically converts to uppercase
- Numbers and special characters are not allowed
- Click "Cancel" to return to predefined list
7. **Select Cell Type** (Optional, defaults to "STRING")
- Available options:
- Numeric
- String
- Blank
- Local Date
- Enum
- Note: Some technical types are hidden from the list
8. **Enter Default Value** (Optional)
- A default value to use if the Excel cell is empty
- Text input field
- Example: "N/A", "0", "Default Location"
9. **Enter Constant Value** (Optional)
- A constant value that will always be used for this column
- Text input field
- Example: "ACTIVE", "USA"
10. **Enter Cell Format** (Optional)
- Format specification for the cell data
- Text input field
- Example: Date formats, number formats
11. **Set Mandatory** (Checkbox, defaults to unchecked)
- Check "Required field" if this column must have data in Excel
- Unchecked = Optional field
- Checked = Required field (will show error if empty during import)
12. **Set Enabled** (Checkbox, defaults to checked)
- Check "Active" to enable this configuration
- Unchecked = Configuration is disabled (skipped during import)
- Checked = Configuration is active (used during import)
13. **Click "Create" button**
- Button is disabled until all required fields are filled
- Tooltip: "Create a new import employee configuration"
14. **Success message appears**
- "Configuration was added successfully"
- The modal closes automatically
- The new configuration appears in the table
### Field Validation
- **Required fields** are marked with a red asterisk (\*)
- **Invalid fields** show a red border when you try to submit
- **Create button** is disabled until all required fields are valid
- **Tooltips** appear on hover for buttons (blue tooltips)
---
## Editing a Configuration
### Step-by-Step Guide
1. **Locate the configuration** in the table
- Use search if needed
2. **Click the Edit icon (pencil)** in the Options column
- Tooltip: "Edit configuration"
3. **The edit form modal opens**
- Title: "Edit Import Employee Configuration"
- All fields are pre-filled with current values
4. **Modify the fields as needed**
- Same fields and rules as creating a new configuration
- Note: Column Letter shows current value (even if it was custom)
- Used column letters are updated (current configuration's letter remains available)
5. **Click "Update" button**
- Tooltip: "Update the import employee configuration"
6. **Success message appears**
- "Configuration was updated successfully"
- The table refreshes with updated data
### Important Notes
- You can change the Type Process, but this may affect which fields are required
- Changing Column Letter to a used letter will show an error
- The current configuration's column letter is always available for editing
---
## Deleting a Configuration
### Step-by-Step Guide
1. **Locate the configuration** in the table
2. **Click the Delete icon (trash)** in the Options column
- Tooltip: "Delete configuration"
3. **Confirmation dialog appears**
- Title: "Are you sure?"
- Message: "Do you want to delete the configuration for column \[LETTER\]?"
- Options:
- **"Yes, delete it!"** - Confirms deletion
- **"Cancel"** - Cancels the action
4. **If confirmed:**
- Configuration is permanently deleted
- Success message: "Deleted! Configuration has been deleted."
- Table refreshes automatically
5. **If cancelled:**
- Dialog closes
- No changes are made
- Configuration remains in the table
### Important Notes
- Deletion is permanent and cannot be undone
- After deletion, the column letter becomes available for new configurations
- Make sure the configuration is not needed before deleting
---
## Understanding Type Process Options
### EMPLOYEE (Default)
**Purpose**: Maps Excel columns to standard employee data fields
**When to use**: For basic employee information like:
- Employee ID
- First Name
- Last Name
- Email
- Phone Number
- Organization
- Location
- Work Group
**Fields shown**:
- Column Name Person (Required) - Select from person fields
- Attribute Name Entity (Auto-filled, Read-only) - Shows automatically
**Example**:
- Header Name: "Employee ID"
- Column Letter: "A"
- Column Name Person: "identification"
- Attribute Name Entity: "identification" (auto-filled)
### TYPE TEST
**Purpose**: Maps Excel columns to drug and alcohol test types
**When to use**: For test type columns like:
- Pre-Employment tests
- Post-Accident tests
- Reasonable Suspicion/Cause tests
- Return to Duty tests
**Fields shown**:
- Type Test (Required) - Select from:
- Pre Employment
- Post Accident
- Reasonable Susp Cause
- Return To Duty
**Example**:
- Header Name: "Pre-Employment"
- Column Letter: "H"
- Type Process: "TYPE TEST"
- Type Test: "PRE\_EMPLOYMENT"
### CUSTOM COLUMN
**Purpose**: Maps Excel columns to custom column data
**When to use**: When you have custom fields defined in the system
**Fields shown**:
- Custom Column (Required) - Select from available custom columns
- Shows the custom column name (not the code)
**Example**:
- Header Name: "Custom Field 1"
- Column Letter: "J"
- Type Process: "CUSTOM COLUMN"
- Custom Column: "Emergency Contact Name"
### ADDITIONAL\_DATA
**Purpose**: For additional data that doesn't fit standard categories
**When to use**: For special data fields not covered by other types
**Fields shown**:
- Additional Data (Required) - Text input field
**Note**: This option is hidden from the Type Process dropdown but can be edited if it exists in existing configurations.
---
## Field Descriptions
### Header Name
- **Type**: Text input
- **Required**: Yes
- **Purpose**: The user-friendly name that appears as the Excel column header
- **Example**: "Employee ID", "First Name", "Location Code"
- **Validation**: Cannot be empty
### Column Letter
- **Type**: Dropdown or Custom text input
- **Required**: Yes
- **Purpose**: Identifies which Excel column (A, B, C, etc.) this configuration maps to
- **Options**:
- Predefined: N\_A, A-Z, AA-AI
- Custom: Any letter combination (e.g., "HG", "XY")
- **Rules**:
- Letters only (automatically converted to uppercase)
- Used letters are not available (except N\_A)
- N\_A is always available
- **Validation**: Cannot be empty, must be letters only for custom values
### Column Name Person
- **Type**: Dropdown
- **Required**: Yes (only when Type Process is EMPLOYEE)
- **Purpose**: Selects which person field this Excel column maps to
- **Options**: All available person fields (system fields are hidden)
- **Behavior**: When selected, automatically fills Attribute Name Entity
- **Example**: "identification", "name", "lastName", "organization\_id"
### Attribute Name Entity
- **Type**: Read-only text input
- **Required**: No (auto-filled)
- **Purpose**: Shows the system attribute name (automatically set based on Column Name Person)
- **Behavior**:
- Auto-fills when Column Name Person is selected
- For foreign keys (ending in \_id), shows format: "entityName.code"
- Example: "organization\_id" → "organization.code"
- **Cannot be edited**: This field is read-only
### Cell Type
- **Type**: Dropdown
- **Required**: No (defaults to "STRING")
- **Purpose**: Defines the data type expected in the Excel cell
- **Options**:
- Numeric - For numbers
- String - For text (default)
- Blank - For empty cells
- Local Date - For dates
- Enum - For enumerated values
### Default Value
- **Type**: Text input
- **Required**: No
- **Purpose**: Value to use if the Excel cell is empty
- **Example**: "N/A", "0", "Default Location"
- **Use case**: When you want to provide a fallback value for empty cells
### Constant Value
- **Type**: Text input
- **Required**: No
- **Purpose**: A constant value that will always be used for this column
- **Example**: "ACTIVE", "USA", "2024"
- **Use case**: When the column should always have the same value regardless of Excel content
### Cell Format
- **Type**: Text input
- **Required**: No
- **Purpose**: Format specification for how the cell data should be interpreted
- **Example**: Date formats, number formats
- **Use case**: When you need specific formatting rules for the imported data
### Mandatory (Required Field)
- **Type**: Checkbox
- **Required**: No (defaults to unchecked)
- **Purpose**: Indicates if this field must have data in the Excel file
- **Options**:
- Unchecked = Optional (gray "NOT REQUIRED" badge)
- Checked = Required (green "REQUIRED" badge)
- **Behavior**:
- If checked and Excel cell is empty, import will show an error
- If unchecked, empty cells are allowed
### Enabled (Active)
- **Type**: Checkbox
- **Required**: No (defaults to checked)
- **Purpose**: Controls whether this configuration is used during import
- **Options**:
- Checked = Active (green "ENABLED" badge) - Configuration is used
- Unchecked = Inactive (red "DISABLED" badge) - Configuration is skipped
- **Use case**: Temporarily disable a configuration without deleting it
---
## Validation Rules and Error Messages
### Required Field Validation
**Rule**: Fields marked with red asterisk (\*) must be filled
**Error indication**:
- Red border around the field
- Create/Update button remains disabled
**Required fields**:
- Type Process (always)
- Header Name (always)
- Column Letter (always)
- Type Test (when Type Process is TYPE\_TEST)
- Custom Column (when Type Process is CUSTOM\_COLUMN)
- Additional Data (when Type Process is ADDITIONAL\_DATA)
- Column Name Person (when Type Process is EMPLOYEE)
### Column Letter Validation
**Rules**:
- Cannot be empty
- For custom values: Letters only (numbers and special characters are automatically removed)
- Automatically converted to uppercase
- Used letters (except N\_A) cannot be selected again
**Error messages**:
- "Column Letter is required" - If left empty
- Column letter not available in dropdown if already used
### Form Submission Validation
**Rule**: All required fields must be valid before submission
**Behavior**:
- Create/Update button is disabled until form is valid
- Red borders appear on invalid required fields
- Tooltip on disabled button explains why it's disabled
**Success messages**:
- Create: "Configuration was added successfully"
- Update: "Configuration was updated successfully"
**Error messages**:
- Create: "Failed to add configuration"
- Update: "Failed to update configuration"
- Delete: "Failed to delete configuration"
## Common Use Cases
### Use Case 1: Setting Up Basic Employee Import
**Scenario**: You need to import employee data with standard fields (ID, Name, Email)
**Steps**:
1. Create configuration for Employee ID
- Type Process: EMPLOYEE
- Header Name: "Employee ID"
- Column Letter: "A"
- Column Name Person: "identification"
- Mandatory: Checked
- Enabled: Checked
2. Create configuration for First Name
- Type Process: EMPLOYEE
- Header Name: "First Name"
- Column Letter: "B"
- Column Name Person: "name"
- Mandatory: Checked
- Enabled: Checked
3. Create configuration for Email
- Type Process: EMPLOYEE
- Header Name: "Email"
- Column Letter: "C"
- Column Name Person: "email"
- Mandatory: Unchecked (optional)
- Enabled: Checked
### Use Case 2: Adding Test Type Columns
**Scenario**: You need to import pre-employment and post-accident test information
**Steps**:
1. Create configuration for Pre-Employment
- Type Process: TYPE TEST
- Header Name: "Pre-Employment"
- Column Letter: "H"
- Type Test: "PRE\_EMPLOYMENT"
- Mandatory: Unchecked
- Enabled: Checked
2. Create configuration for Post-Accident
- Type Process: TYPE TEST
- Header Name: "Post-Accident"
- Column Letter: "I"
- Type Test: "POST\_ACCIDENT"
- Mandatory: Unchecked
- Enabled: Checked
### Use Case 3: Using Custom Column Letters
**Scenario**: Your Excel file uses column "HG" for a special field
**Steps**:
1. Create configuration
- Type Process: EMPLOYEE
- Header Name: "Special Field"
- Column Letter: Select "Custom..." then enter "HG"
- Column Name Person: Select appropriate field
- Enabled: Checked
### Use Case 4: Temporarily Disabling a Configuration
**Scenario**: You want to skip a column during import without deleting the configuration
**Steps**:
1. Find the configuration in the table
2. Click Edit icon
3. Uncheck "Active" (Enabled field)
4. Click Update
5. Configuration now shows red "DISABLED" badge
6. This column will be skipped during import
### Use Case 5: Making a Field Optional
**Scenario**: A field that was required should now be optional
**Steps**:
1. Find the configuration
2. Click Edit icon
3. Uncheck "Required field" (Mandatory)
4. Click Update
5. Configuration now shows gray "NOT REQUIRED" badge
6. Empty cells in this column will no longer cause import errors
## Tooltips and Helpful Hints
Throughout the interface, you'll find helpful tooltips (blue information boxes) that appear when you hover over elements:
### Search Bar
- **Tooltip**: "Search configurations by header name, column letter, or attribute"
- **Location**: Search input field
### New Configuration Button
- **Tooltip**: "Create a new import employee configuration"
- **Location**: Orange button with plus icon
### Edit Icon
- **Tooltip**: "Edit configuration"
- **Location**: Pencil icon in Options column
### Delete Icon
- **Tooltip**: "Delete configuration"
- **Location**: Trash icon in Options column
### Cancel Button (in form)
- **Tooltip**: "Cancel and close the form"
- **Location**: Cancel button in modal
### Create/Update Button (in form)
- **Tooltip**:
- "Create a new import employee configuration" (when creating)
- "Update the import employee configuration" (when editing)
- **Location**: Create/Update button in modal
## Best Practices
### 1. Naming Conventions
- Use clear, descriptive Header Names
- Match Header Names to your Excel file column headers exactly
- Example: "Employee ID" not "Emp ID" or "ID"
### 2. Column Letter Management
- Use standard letters (A-Z) when possible
- Reserve custom letters (like "HG") for special cases
- Keep track of which letters are used
### 3. Required Fields
- Mark fields as Required only when data is essential
- Too many required fields can cause import failures
- Consider making optional fields that might not always have data
### 4. Testing Configurations
- Create test configurations with Enabled unchecked first
- Test with a small Excel file before full import
- Verify data mapping is correct before enabling
### 5. Organization
- Use consistent Header Names across similar configurations
- Group related configurations together (they'll be sorted by Column Letter)
- Document any special configurations for your team
### 6. Maintenance
- Review configurations periodically
- Disable unused configurations instead of deleting (if you might need them later)
- Delete only when certain they're no longer needed
---
## Additional Notes
### Documentation Button
- A documentation button (orange circle with document icon) appears next to the "Import Employee Configuration" title
- Clicking it opens the full user documentation in a new tab
### Table Sorting
- Configurations are automatically sorted by Column Letter (ascending)
- A-Z, then AA-AI, then custom letters
- N\_A appears first if used
### Pagination
- If you have many configurations, use pagination at the bottom of the table
- Use the page numbers or next/previous arrows to navigate
### Filtering
- The search bar filters all visible columns
- Search is case-insensitive
- Clear search to see all configurations again
---
## Summary
The Import Employee Configuration feature provides a flexible way to map Excel columns to employee data fields. By understanding:
- **Type Process options** and when to use each
- **Field requirements** and validation rules
- **How to create, edit, and delete** configurations
- **Best practices** for naming and organization
You can efficiently set up and maintain your employee import configurations, ensuring accurate data import from Excel files.
For additional help, use the documentation button or contact your system administrator.
# Access Management
The Access Management module is responsible for managing users, roles, and permissions within the portal.
This section is used to manage each user's access and privileges according to their assigned role.
# Permissions
The **Permissions** section shows a detailed list of all the permissions available on the portal, indicating which ones are active and which ones are disabled.
**IMPORTANT: **If you want to create a new permission, you must notify the person in charge of **NEXUS** administration, as internal software development is required to associate that permission with specific elements of the portal.
To **search** **for a permission**, click on the magnifying glass icon 🔍, and to clear the filter, use the “X” icon.
[](https://wiki.nexus33.com/uploads/images/gallery/2026-01/Xkuscreenshot-1.png)
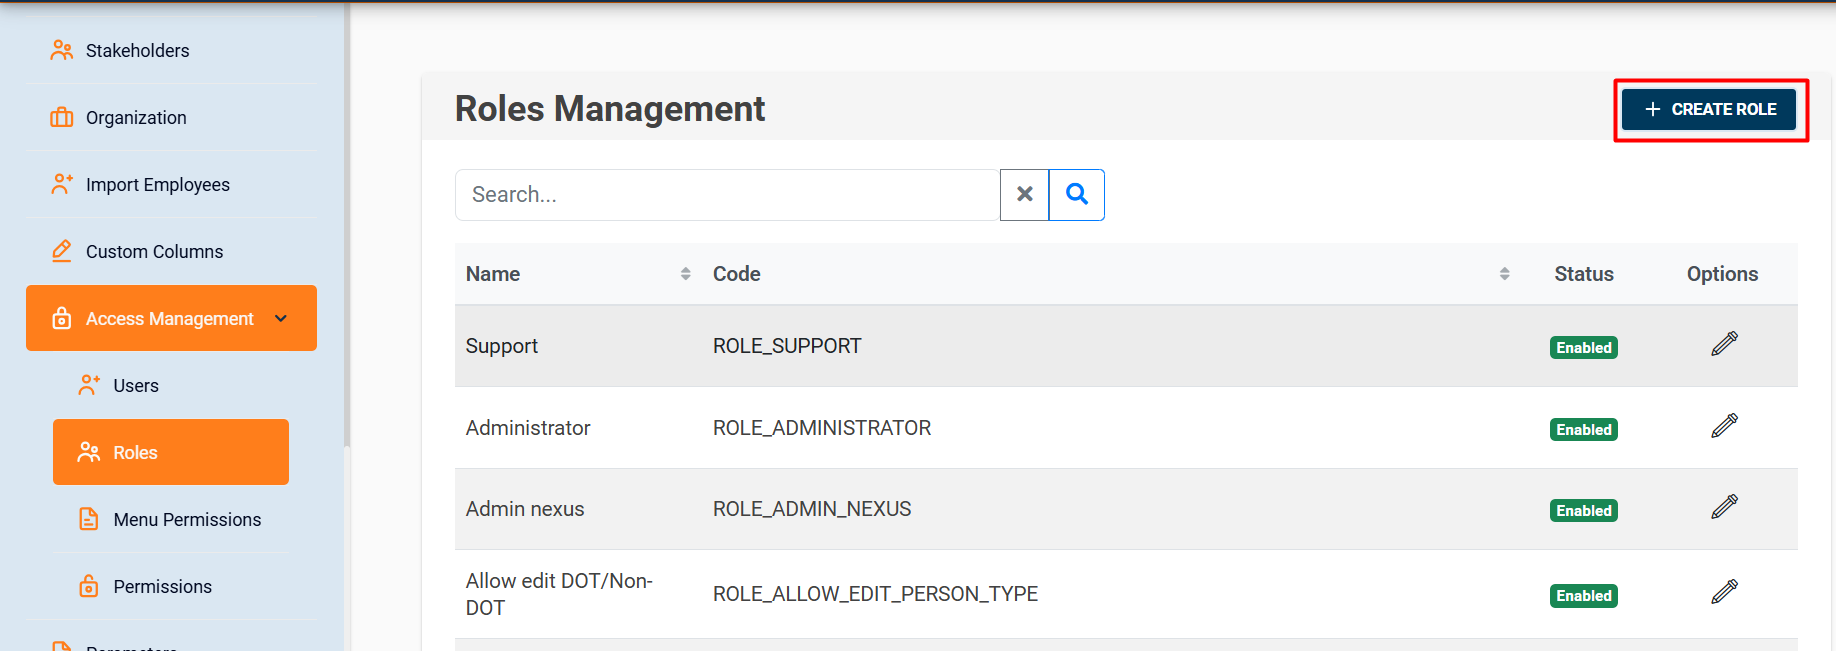
# Roles
In the **Roles** section, you can **create, edit, and list** the roles that exist in the system.
To create a role, you only need to provide the name and code. The code must be written in uppercase letters, and spaces must be replaced with underscores (\_).
[](https://wiki.nexus33.com/uploads/images/gallery/2026-01/screenshot-2.png)
[](https://wiki.nexus33.com/uploads/images/gallery/2026-01/screenshot-3.png)
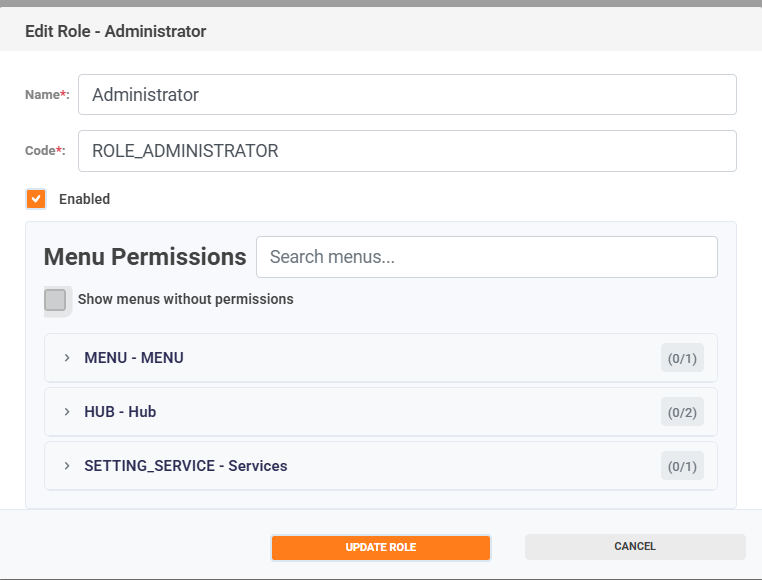
📝 **Note**: Permissions are assigned to each role using the **Edit** Role option.
In the **Edit** option, you can modify the information of an existing role, activate or deactivate its availability in the system, and assign the **corresponding permissions according to the menu sections.**
[](https://wiki.nexus33.com/uploads/images/gallery/2026-01/zgOimage.png)
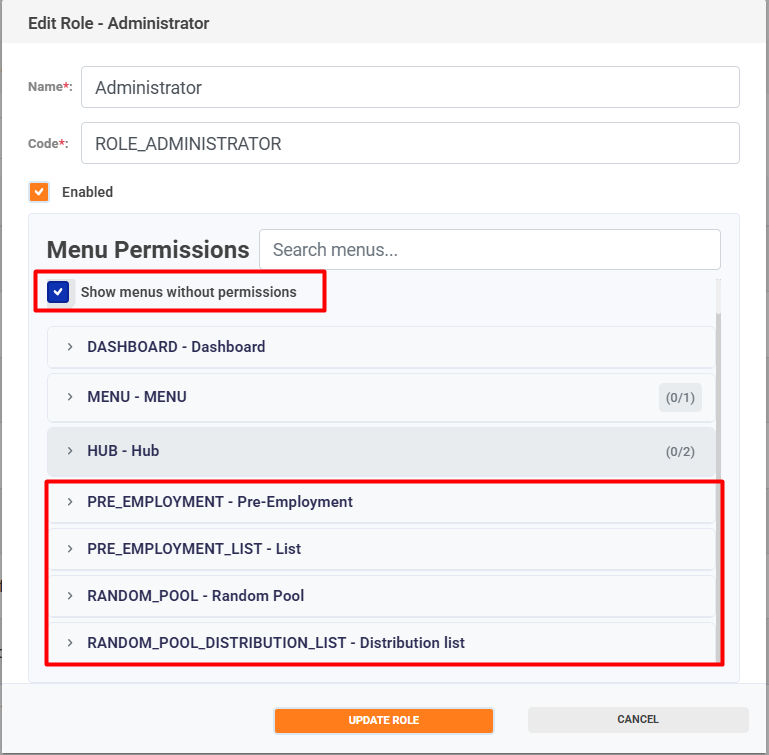
The **Menu Permissions** section only displays menu options that have already been assigned **permissions**.
If you want to view options that do not yet have permissions, click **Show Menus Without Permissions**.
[](https://wiki.nexus33.com/uploads/images/gallery/2026-01/uTWimage.png)
📝 **Note**: To assign permissions to a menu option, you must enter the **Menu permissions** (**[https://wiki.nexus33.com/books/4-settings/page/menu-permissions](https://wiki.nexus33.com/books/4-settings/page/menu-permissions "Menu permission"))** module.
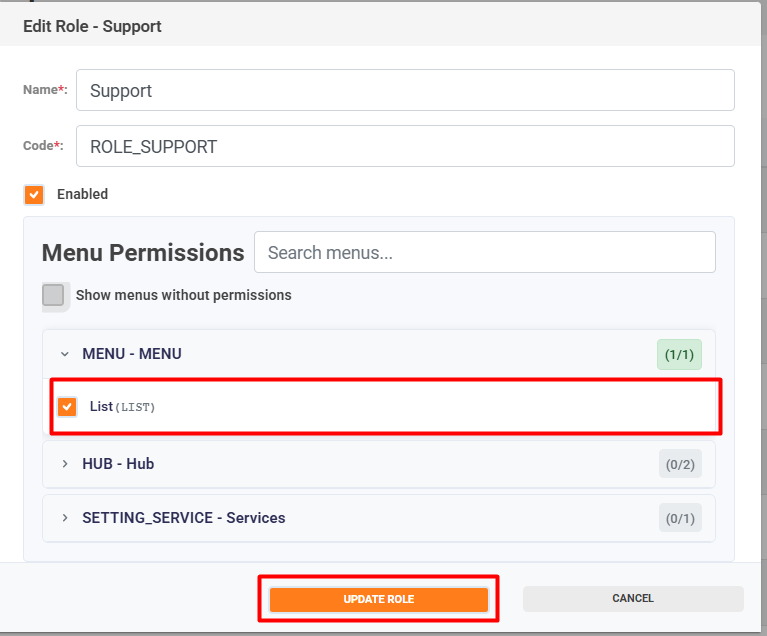
To assign **permissions** to a role, select the menu option; the available **permissions** will be displayed.
**Check the box** for the permission you want to assign and click **Update Role** to save the changes.
[](https://wiki.nexus33.com/uploads/images/gallery/2026-01/Y8Cimage.png)
To **search** for a role, click on the magnifying glass icon 🔍, and to clear the filter, use the “X” icon.
[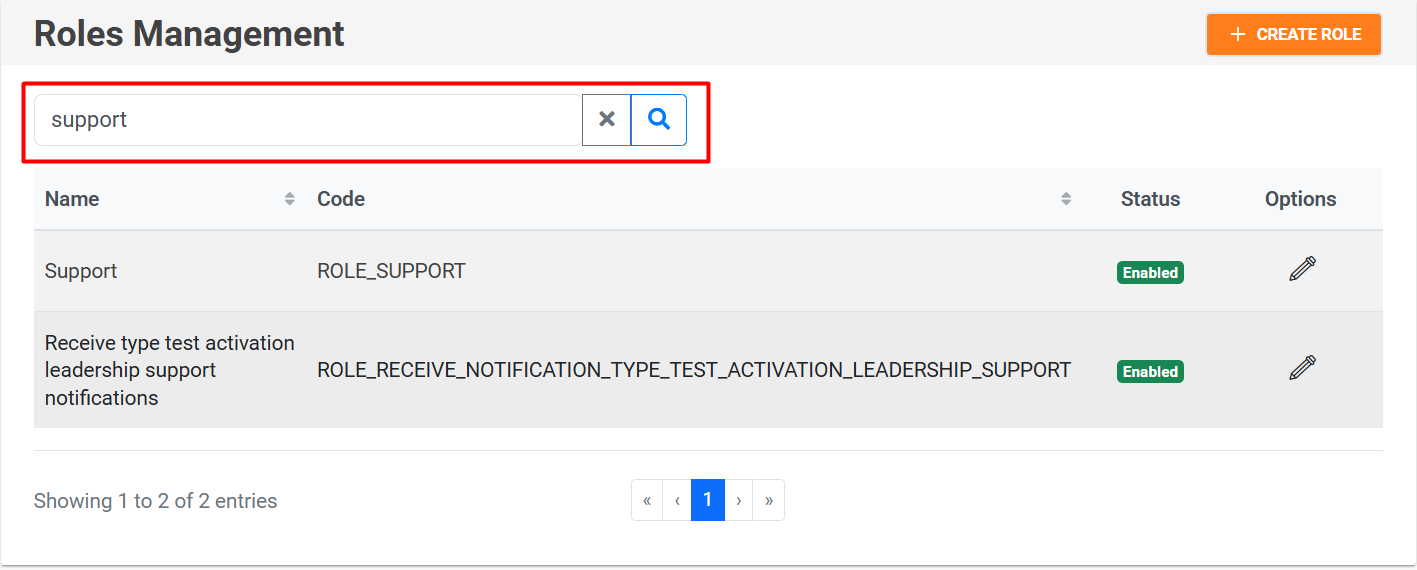](https://wiki.nexus33.com/uploads/images/gallery/2026-01/screenshot-6.png)
# Users
In the **users** section, you can create, edit, and list system users.
#### Creating users
There are two ways to create users in the system:
1. Assign permissions to an existing employee:
- Select the “+” icon next to the employee. [](https://wiki.nexus33.com/uploads/images/gallery/2026-01/2mOimage.png)
- A confirmation window will appear to validate whether you want to convert that employee into a portal user. [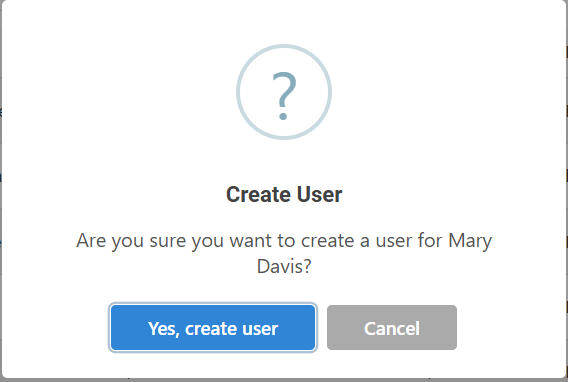](https://wiki.nexus33.com/uploads/images/gallery/2026-01/0rOimage.png)
- Once the credentials have been successfully created, a temporary password will be generated and sent to the user's registered email address. [](https://wiki.nexus33.com/uploads/images/gallery/2026-01/ziFimage.png)
#### Creating multiple users
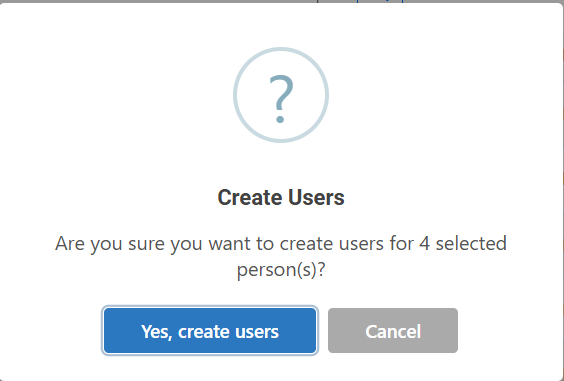
Select several employees using the checkboxes and click on the “Create User” button to generate multiple users simultaneously.
[](https://wiki.nexus33.com/uploads/images/gallery/2026-01/L8pimage.png)
A confirmation window will appear to validate whether you want to convert the selected employees into users.
[](https://wiki.nexus33.com/uploads/images/gallery/2026-01/WT1image.png)
[](https://wiki.nexus33.com/uploads/images/gallery/2026-01/Ltzimage.png)
#### Editing users
From the Edit option, you can:
- Enable or disable a user's access to the portal.
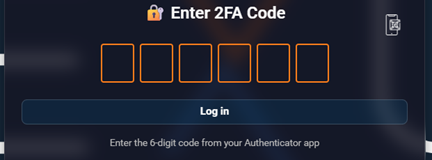
- Enable or disable multi-factor authentication (MFA).
- Enable or disable Show QR to embed the two-factor authentication app.
- Allows you to reset the password for portal users in case of forgotten or lost access. [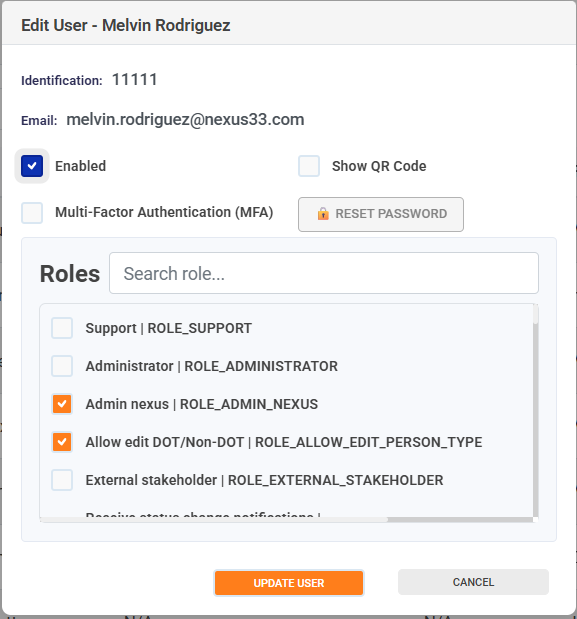](https://wiki.nexus33.com/uploads/images/gallery/2026-01/Fosimage.png)
📝 Note: If the user has never enabled multi-factor authentication, a QR code will be displayed when they log in for the first time, which they must scan with the Scanner Authenticator app.
[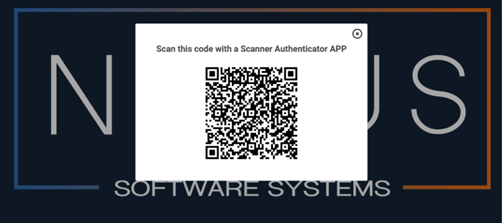](https://wiki.nexus33.com/uploads/images/gallery/2026-01/vORimage.png)
To view the **QR** code again, click on the cell phone icon 📱.
[](https://wiki.nexus33.com/uploads/images/gallery/2026-01/RhVimage.png)
If you lose or change your device, you can re-enable the “**Show QR Code**” option to reconfigure authentication with Google Authenticator.
[](https://wiki.nexus33.com/uploads/images/gallery/2026-01/V2Vimage.png)
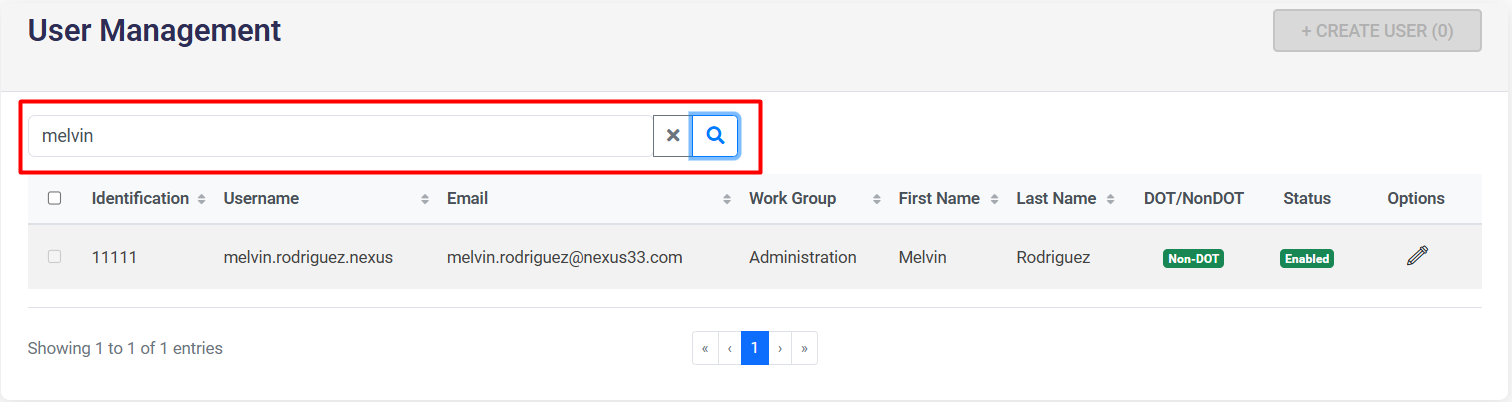
To **search** for a user, click on the magnifying glass icon 🔍, and to clear
[](https://wiki.nexus33.com/uploads/images/gallery/2026-01/SrHimage.png)
# Menu permissions
Menu Permissions is the module responsible for assigning permissions to the portal menu options.
[](https://wiki.nexus33.com/uploads/images/gallery/2026-01/kEfimage.png)
Using the **Search** Menus field, you can search for the menu option to which you want to assign permissions.
[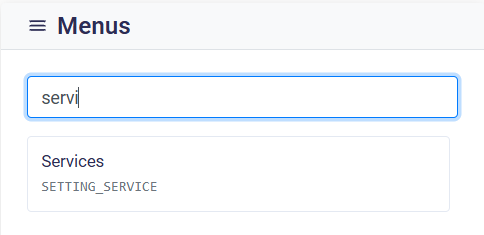](https://wiki.nexus33.com/uploads/images/gallery/2026-01/JjPimage.png)
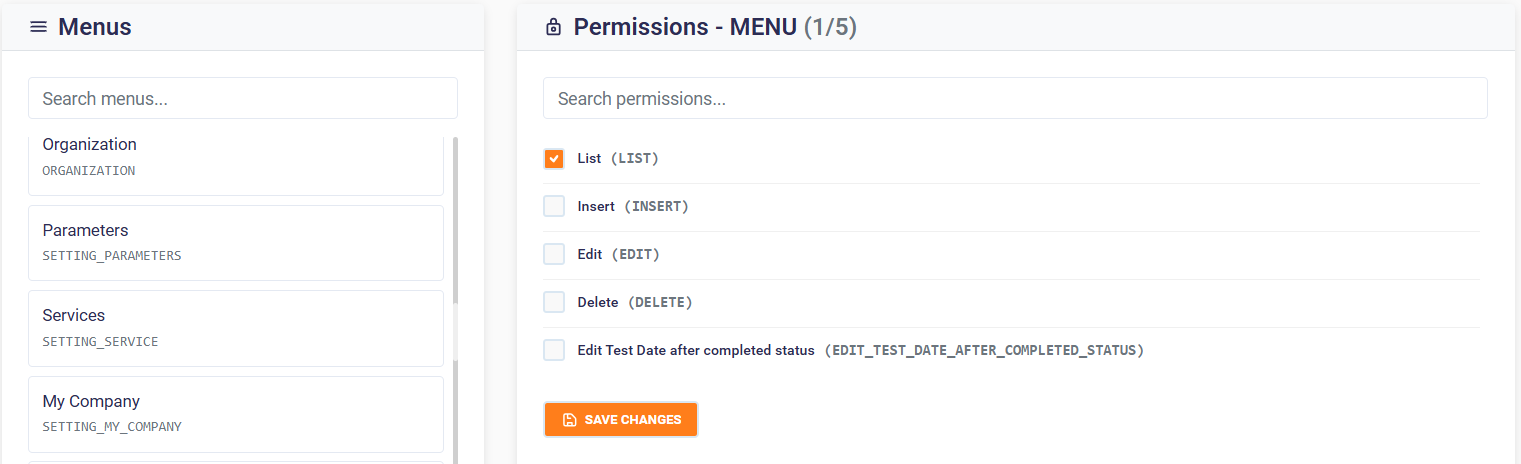
Select the menu option and, in the right-hand panel, check the box for the **permissions** you want to assign.
Finally, click **Save Changes** to save the configuration.
[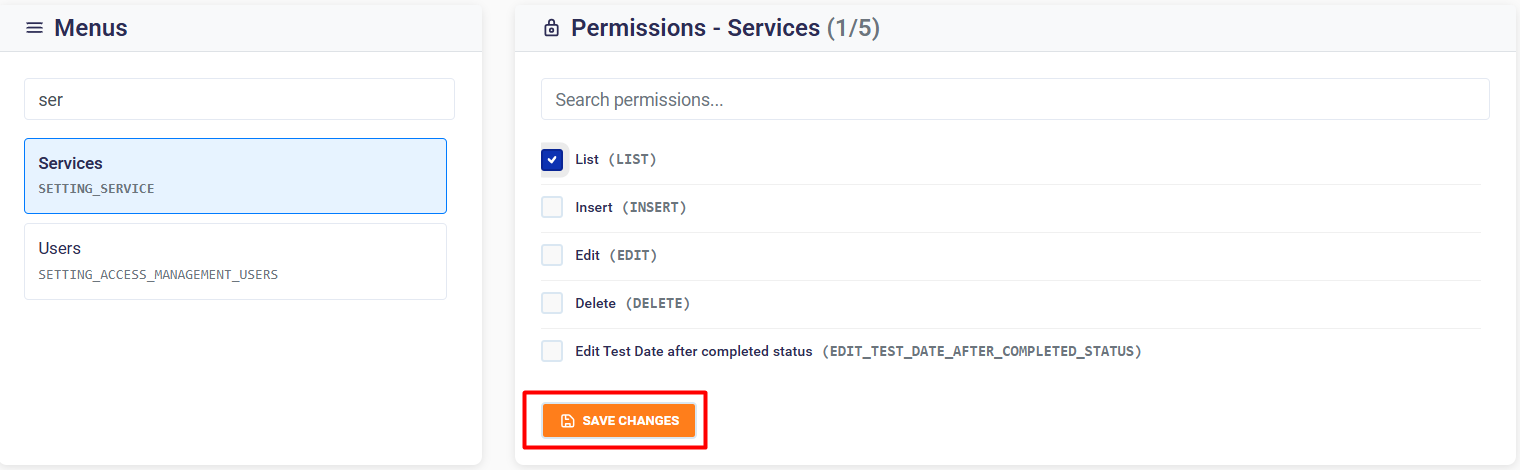](https://wiki.nexus33.com/uploads/images/gallery/2026-01/dUtimage.png)
[](https://wiki.nexus33.com/uploads/images/gallery/2026-01/YpFimage.png)
# Email Notification
## Overview
The Email Notification module allows you to create and manage email notification templates that can be automatically sent based on service and form configurations. This guide will walk you through all the features and workflows available in this module.
---
## Email Notifications List
### Accessing the List
[](https://wiki.nexus33.com/uploads/images/gallery/2026-01/vUyimage.png)
The Email Notifications list displays all available email notification templates in your system. You can access this list from the main navigation menu.
### List Features
#### Search Functionality
[](https://wiki.nexus33.com/uploads/images/gallery/2026-01/EXqimage.png)
The search bar at the top of the list allows you to search across multiple fields:
- **Notification Name**: Search by the name of the notification
- **Subject**: Search by email subject line
- **For whom**: Search by recipient type
- **Description**: Search within notification descriptions
**How to use:**
1. Type your search term in the search field
2. Press Enter or click outside the field
3. The list will automatically filter to show matching results
4. To clear the search, delete all text from the search field
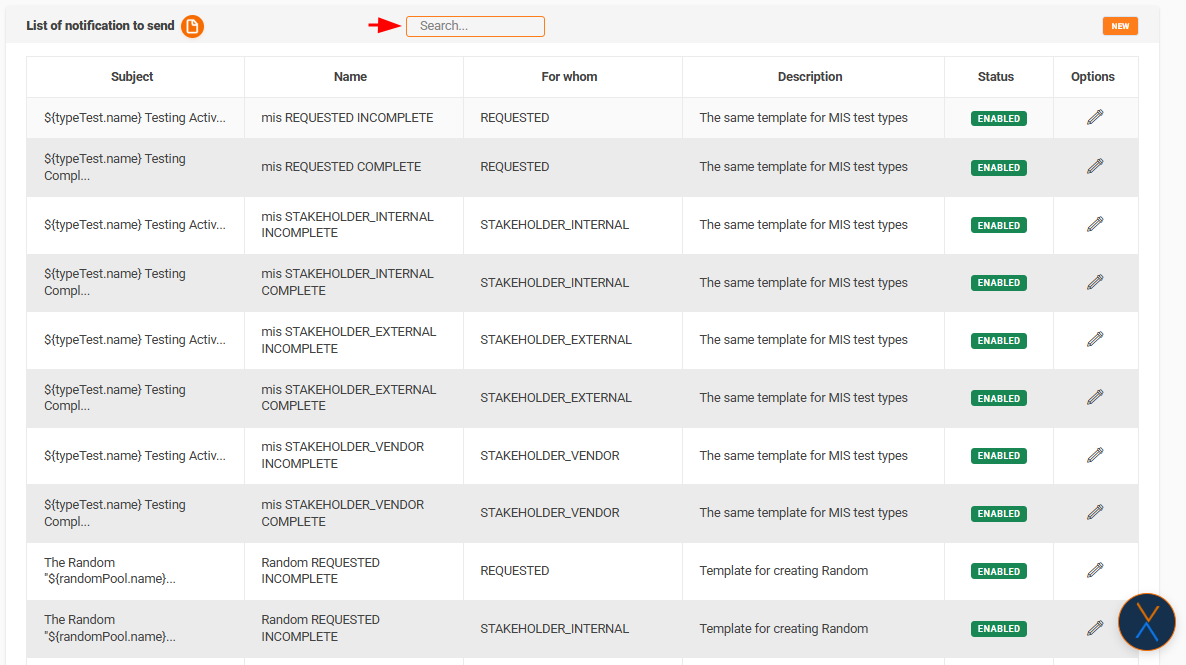
#### Table Columns
[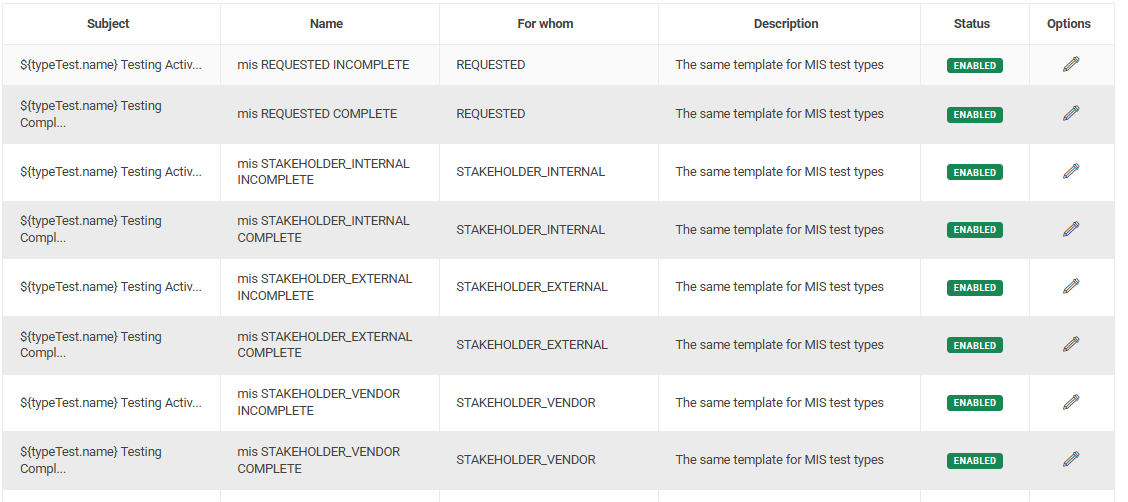](https://wiki.nexus33.com/uploads/images/gallery/2026-01/7O6image.png)
The list displays the following information:
- **Subject**: The email subject line (truncated if longer than 30 characters)
- **Name**: The notification template name
- **For whom**: The recipient category for this notification
- **Description**: A brief description of the notification (truncated if longer than 50 characters)
- **Status**: Shows whether the notification is **Enabled** (green) or **Disabled** (red)
#### Actions Available
[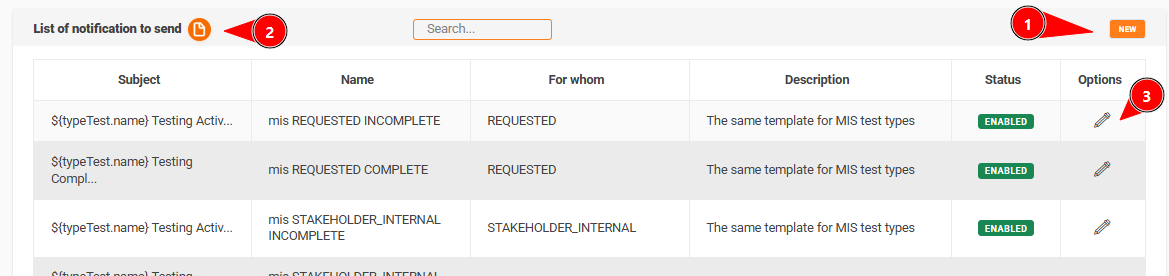](https://wiki.nexus33.com/uploads/images/gallery/2026-01/WrNimage.png)
1. **New Button**: Located in the top right corner, allows you to create a new email notification
2. **Documentation Button**: Located next to the "List of notification to send" title, provides access to additional documentation
3. **Edit Action**: Each row has an edit icon (pencil) in the Options column that allows you to modify the notification
#### Pagination
The list supports pagination to navigate through multiple pages of notifications. Use the pagination controls at the bottom of the table to move between pages.
---
## Creating a New Email Notification
### Step 1: Access the Creation Form
[](https://wiki.nexus33.com/uploads/images/gallery/2026-01/v9simage.png)
1. From the Email Notifications list, click the **New** button in the top right corner
2. You will be redirected to the creation form
### Step 2: Fill Required Fields
[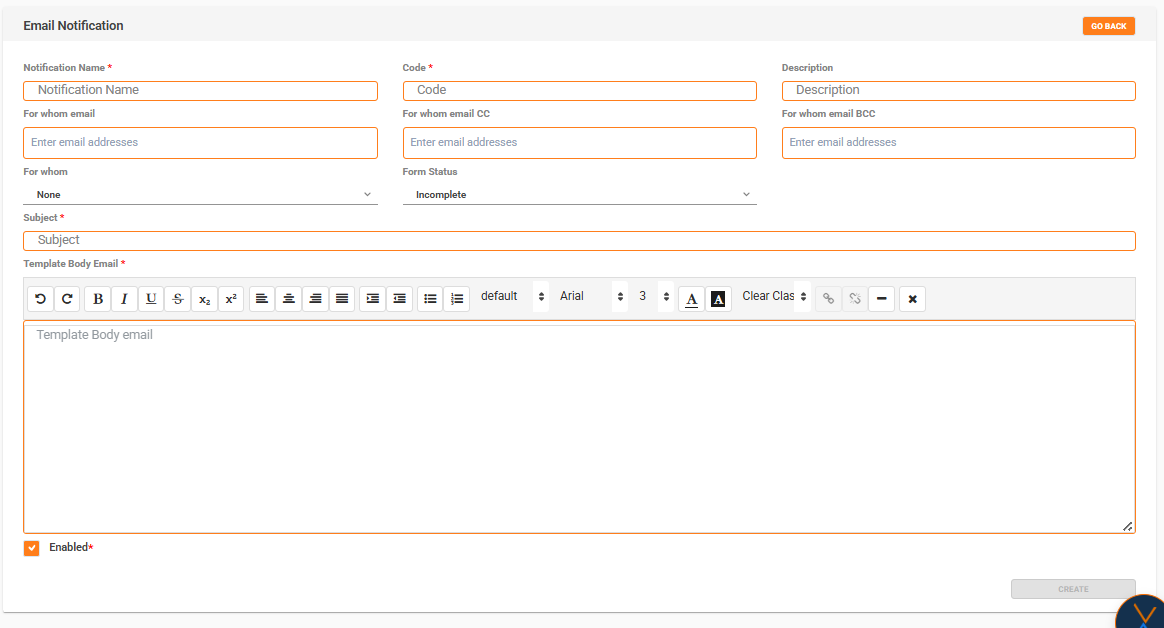](https://wiki.nexus33.com/uploads/images/gallery/2026-01/KBJimage.png)
The following fields are **required** and must be filled before you can save:
#### Notification Name
- Enter a descriptive name for your notification
- This name will appear in the notifications list
- Example: "Driver License Expiration Reminder"
#### Code
- Enter a unique code for the notification
- **Rules**:
- Only uppercase letters (A-Z) and underscores (\_) are allowed
- Example: `DRIVER_LICENSE_EXPIRATION`
- **Note**: This code must be unique across all notifications
- The field automatically converts lowercase letters to uppercase
#### Subject
- Enter the email subject line
- This is what recipients will see in their email inbox
- Example: "Your Driver License is About to Expire"
#### Template Body Email
- Enter the content of the email body in text format.
Example: Hello:
Your driver's license will expire soon. Please renew it.
### Step 3: Fill Optional Fields
#### Description
- Provide additional information about the notification
- This helps identify the notification's purpose
- Optional field
#### For whom email
- Enter email addresses that will receive this notification
- You can add multiple email addresses
- Click Enter or comma after each email address
- Valid email format is required
#### For whom email CC
- Enter email addresses for carbon copy recipients
- Multiple emails can be added
- Optional field
#### For whom email BCC
- Enter email addresses for blind carbon copy recipients
- Multiple emails can be added
- Optional field
#### For whom
- Select the recipient category from the dropdown
- Options may include: None, Employee, Manager, etc.
- Default value is "None"
- Optional field
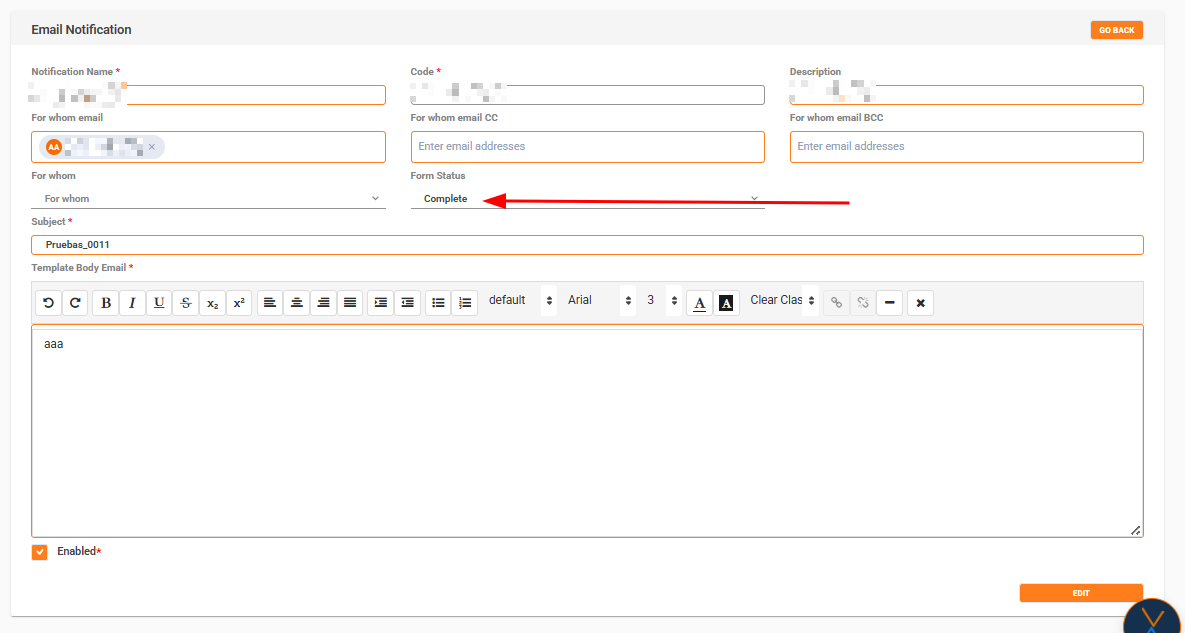
#### Form Status
- Select the form status that triggers this notification
- Available options:
- **Complete**: Notification sent when form status is Complete
- **Incomplete**: Notification sent when form status is Incomplete
- **Default**: Incomplete (automatically selected for new notifications)
- **Important**: This setting affects when Result Test options become available (see Result Test Selection section)
#### Enabled
- Checkbox to enable or disable the notification
- **Default**: Enabled (checked)
- When disabled, the notification will not be sent even if conditions are met
### Step 4: Save the Notification
[](https://wiki.nexus33.com/uploads/images/gallery/2026-01/c94image.png)
1. Review all entered information
2. Ensure all required fields are filled
3. Click the **CREATE** button
4. A success message will appear confirming the notification was created
5. After creation, the form will switch to edit mode and the **Service/Form Type** section will become available
---
## Editing an Existing Email Notification
### Step 1: Access the Edit Form
[](https://wiki.nexus33.com/uploads/images/gallery/2026-01/Bn9image.png)
1. From the Email Notifications list, click the **edit icon** (pencil) in the Options column for the notification you want to modify
2. You will be redirected to the edit form with all current values pre-filled
### Step 2: Modify Fields
[](https://wiki.nexus33.com/uploads/images/gallery/2026-01/KTsimage.png)
- You can modify any field except the **Code** field (which is disabled in edit mode)
- All validation rules still apply
- Required fields must still be filled
### Step 3: Save Changes
[](https://wiki.nexus33.com/uploads/images/gallery/2026-01/FuVimage.png)
1. Make your desired changes
2. Click the **EDIT** button to save
3. A success message will confirm your changes were saved
### Important Notes for Editing
- **Code field**: Cannot be changed after creation (field is disabled)
- **Service/Form Type**: Can be configured after the notification is saved (see Configuring Service/Form Type section)
- **Form Status changes**: If you change Form Status from Complete to Incomplete, all previously selected Result Tests will be automatically deleted
---
## Configuring Service/Form Type
### When Can You Configure Service/Form Type?
[](https://wiki.nexus33.com/uploads/images/gallery/2026-01/U0kimage.png)
The Service/Form Type configuration is **only available after you have saved the notification** (either created or edited). This section appears below the main notification form.
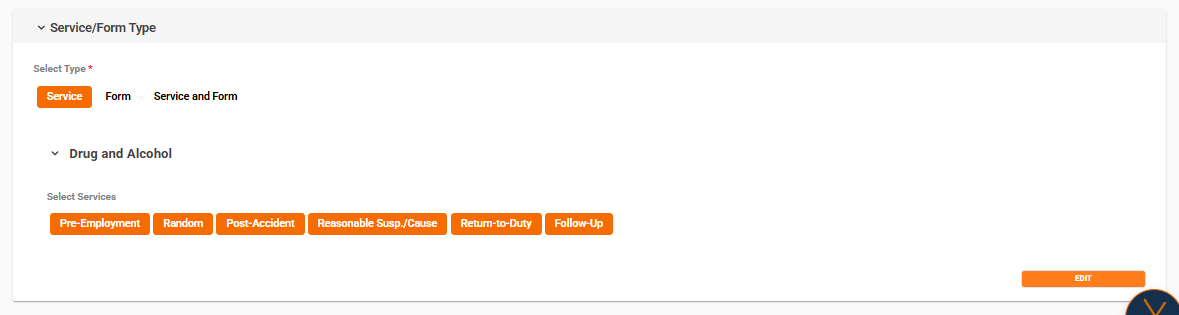
### Step 1: Select Service/Form Type
[](https://wiki.nexus33.com/uploads/images/gallery/2026-01/Cy0image.png)
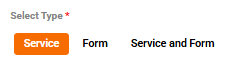
You must first select one of three types:
1. **Service**: Select specific services that will trigger this notification
2. **Form**: Select specific forms that will trigger this notification
3. **Service and Form**: Select both services and their associated forms
Click on the desired type button. The button will highlight to show it's selected.
### Step 2: Configure Based on Selected Type
#### If You Selected "Service"
[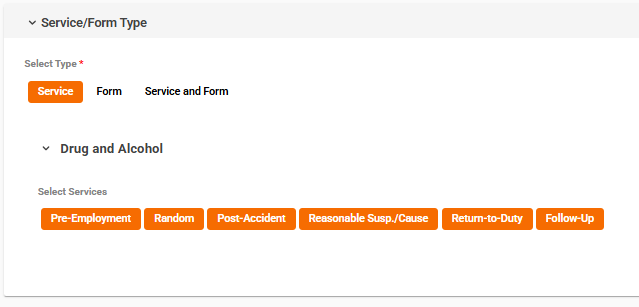](https://wiki.nexus33.com/uploads/images/gallery/2026-01/NPlimage.png)
1. The system will display all available modules
2. Click on a module name to expand it and see available services
3. Click on service buttons to select/deselect them
4. Selected services will be highlighted
5. You can select services from multiple modules
#### If You Selected "Form"
[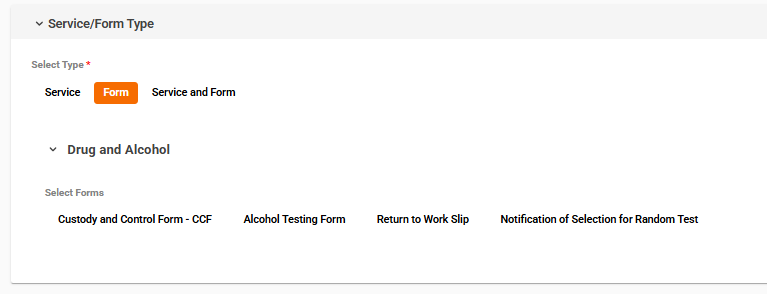](https://wiki.nexus33.com/uploads/images/gallery/2026-01/tK6image.png)
1. The system will display all available modules
2. Click on a module name to expand it and see available forms
3. Click on form buttons to select/deselect them
4. Selected forms will be highlighted
5. **Result Test cards** will appear below selected forms if:
- Form Status is set to "Complete"
- The form has associated Result Tests
- (See Result Test Selection section for details)
#### If You Selected "Service and Form"
[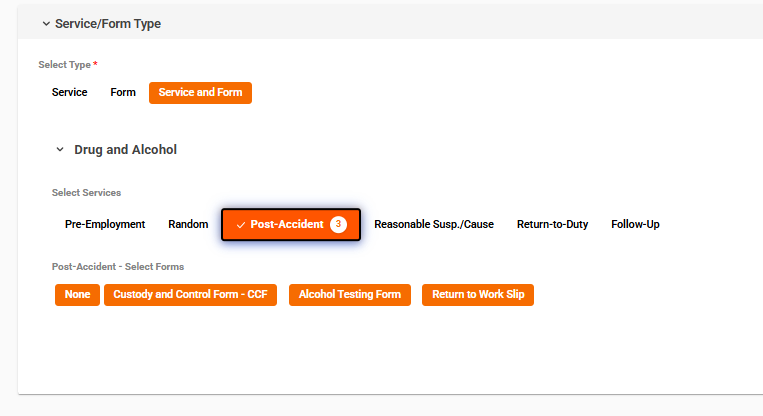](https://wiki.nexus33.com/uploads/images/gallery/2026-01/giuimage.png)
1. The system will display all available modules
2. Click on a module name to expand it
3. You'll see services listed first
4. Click on service buttons to select/deselect services
5. For each selected service, expand it to see associated forms
6. Click on form buttons to select/deselect forms for each service
7. Use the **All/None** button to quickly select or deselect all forms for a specific service
8. **Result Test cards** will appear below selected forms if:
- Form Status is set to "Complete"
- The form has associated Result Tests
- (See Result Test Selection section for details)
### Step 3: Save Service/Form Configuration
[](https://wiki.nexus33.com/uploads/images/gallery/2026-01/Ad6image.png)
1. After making your selections, scroll to the bottom of the Service/Form Type card
2. Click the **SAVE** button (for new configurations) or **EDIT** button (for existing configurations)
3. A success message will confirm your configuration was saved
4. The system will reload to show your saved selections
### Important Notes
- You **must** select a Service/Form Type before you can save the configuration
- If you try to save without selecting a type, you'll see an error message
- You can change the Service/Form Type at any time, but you'll need to reconfigure your selections
- Your previous selections are saved when you switch between types
---
## Result Test Selection
### When Do Result Test Cards Appear?
[](https://wiki.nexus33.com/uploads/images/gallery/2026-01/O7oimage.png)
Result Test cards appear automatically when **all** of the following conditions are met:
1. **Form Status** is set to **"Complete"** (not "Incomplete")
2. **Service/Form Type** is set to either **"Form"** or **"Service and Form"** (not "Service")
3. A **form is selected** in the Service/Form Type configuration
4. The selected form **has associated Result Tests** in the system
If any of these conditions are not met, the Result Test card will not appear.
### How to Use Result Test Cards
[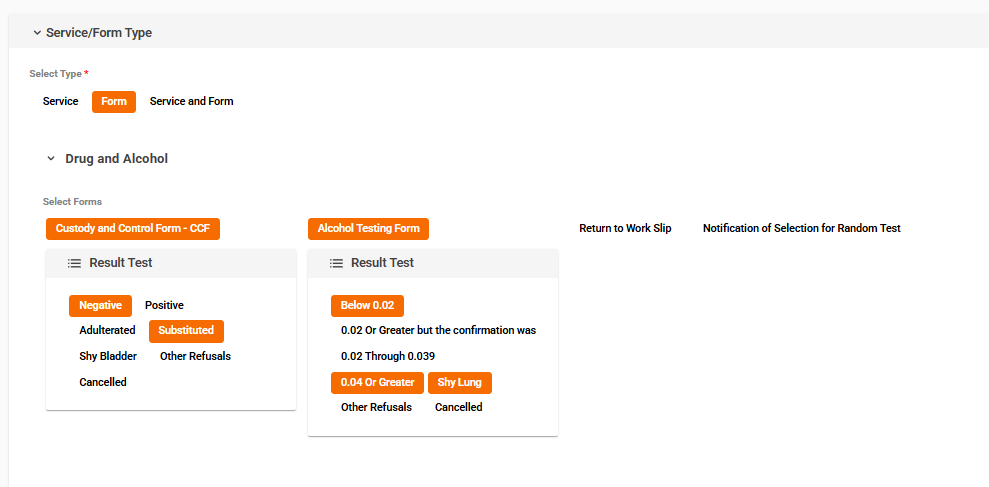](https://wiki.nexus33.com/uploads/images/gallery/2026-01/S30image.png)
1. When a form is selected and conditions are met, a **Result Test** card appears below the form button
2. The card displays all available Result Tests for that specific form
3. Click on Result Test buttons to select/deselect them
4. Selected Result Tests will be highlighted (active state)
5. You can select multiple Result Tests for each form
6. Each form has its own independent set of Result Test selections
### Saving Result Test Selections
- Result Test selections are **automatically included** when you save the Service/Form Type configuration
- Click the **SAVE** or **EDIT** button in the Service/Form Type section
- Your Result Test selections will be saved along with your Service/Form selections
- When you edit the notification later, your Result Test selections will be restored
---
## Field Descriptions
### Required Fields
| Field | Description | Format/Notes |
|---|
| **Notification Name** | A descriptive name for the notification | Text, any characters |
| **Code** | Unique identifier for the notification | Uppercase letters and underscores only (e.g., `DRIVER_LICENSE`) |
| **Subject** | Email subject line | Text, appears in recipient's inbox |
| **Template Body Email** | Email body content | HTML format required (e.g., ` Content `) |
### Optional Fields
| Field | Description | Format/Notes |
|---|
| **Description** | Additional information about the notification | Text, optional |
| **For whom email** | Primary recipient email addresses | Multiple emails, comma or Enter separated |
| **For whom email CC** | Carbon copy recipient email addresses | Multiple emails, comma or Enter separated |
| **For whom email BCC** | Blind carbon copy recipient email addresses | Multiple emails, comma or Enter separated |
| **For whom** | Recipient category | Dropdown selection, default: "None" |
| **Form Status** | Status that triggers the notification | Options: Complete, Incomplete (default: Incomplete) |
| **Enabled** | Enable/disable the notification | Checkbox, default: Enabled (checked) |
---
## Validations and Rules
### Field Validations
1. **Notification Name**: Required, cannot be empty
2. **Code**:
- Required, cannot be empty
- Only uppercase letters (A-Z) and underscores (\_) allowed
- Must be unique (cannot duplicate existing codes)
- Automatically converts to uppercase
3. **Subject**: Required, cannot be empty
4. **Template Body Email**:
- Required, cannot be empty
- Plain text is sufficient
### Email Address Validations
- All email fields (For whom email, CC, BCC) must contain valid email format
- Multiple emails can be entered, separated by comma or Enter key
- Invalid email formats will be rejected
### Service/Form Type Validations
- Service/Form Type configuration can only be saved **after** the notification is created
- You **must** select a Service/Form Type (Service, Form, or Service and Form) before saving the configuration
- If you try to save without selecting a type, you'll receive an error message: "Please select a Service/Form Type before saving"
### Error Messages
Common error messages you may encounter:
- **"The code already exists. Please use a different code."**: The Code you entered is already in use by another notification
- **"Please save the notification template first before configuring services and forms."**: You're trying to configure Service/Form Type before saving the notification
- **"Please select a Service/Form Type before saving."**: You're trying to save Service/Form configuration without selecting a type
- **"An error occurred while saving..."**: General error, check your input and try again
---
## Common Workflows
### Workflow 1: Create a Complete Notification with Service Selection
1. Click **New** from the Email Notifications list
2. Fill in all required fields (Name, Code, Subject, Template Body Email)
3. Set **Form Status** to "Complete" or "Incomplete" as needed
4. Fill optional fields as desired
5. Check **Enabled** if you want the notification active
6. Click **CREATE**
7. After creation, scroll to **Service/Form Type** section
8. Select **Service** type
9. Expand modules and select desired services
10. Click **SAVE** in the Service/Form Type section
11. Your notification is now fully configured
### Workflow 2: Create a Notification with Form and Result Tests
1. Click **New** from the Email Notifications list
2. Fill in all required fields
3. **Important**: Set **Form Status** to **"Complete"** (required for Result Tests)
4. Fill optional fields
5. Click **CREATE**
6. In **Service/Form Type** section, select **Form** type
7. Expand modules and select desired forms
8. **Result Test cards** will appear below selected forms (if forms have Result Tests)
9. Select desired Result Tests by clicking on them
10. Click **SAVE** in the Service/Form Type section
11. Both form selections and Result Test selections are saved
### Workflow 3: Edit and Modify Service/Form Configuration
1. From the list, click **edit icon** for the notification
2. Modify any fields as needed (except Code)
3. Click **EDIT** to save changes
4. Scroll to **Service/Form Type** section
5. Modify your service/form selections as needed
6. If Form Status is "Complete" and you have forms selected, modify Result Test selections
7. Click **EDIT** (or **SAVE**) in the Service/Form Type section
8. Changes are saved
### Workflow 4: Disable a Notification
1. From the list, click **edit icon** for the notification
2. Uncheck the **Enabled** checkbox
3. Click **EDIT**
4. The notification status will change to "Disabled" in the list
5. The notification will not be sent even if conditions are met
---
## Tips and Best Practices
### Naming Conventions
- Use descriptive names for notifications (e.g., "Driver License Expiration - 30 Days Before")
- Use clear, consistent codes (e.g., `DRIVER_LICENSE_30_DAYS`)
- Include dates or timeframes in names when relevant
### Email Content
- Use plain text
- Keep subject lines concise and clear
- Consider including relevant information that recipients need
### Service/Form Selection
- Select only the services/forms that truly need this notification
- Review your selections before saving
- Remember that Result Tests only appear for "Complete" status
### Result Test Selection
- Only select Result Tests that are relevant to your notification purpose
- Remember that changing Form Status to "Incomplete" will delete all Result Test selections
- If you need Result Tests, always keep Form Status as "Complete"
### Testing
- After creating a notification, verify it appears correctly in the list
- Check that all selected services/forms are saved correctly
- If using Result Tests, verify they appear and can be selected when conditions are met
---
## Troubleshooting
### Result Test Cards Not Appearing
**Possible causes:**
1. Form Status is set to "Incomplete" → Change to "Complete"
2. Service/Form Type is set to "Service" → Change to "Form" or "Service and Form"
3. No form is selected → Select a form first
4. The selected form has no Result Tests associated → Result Tests may not exist for this form in the system
### Cannot Save Service/Form Configuration
**Possible causes:**
1. Notification hasn't been saved yet → Save the notification first (CREATE button)
2. No Service/Form Type selected → Select Service, Form, or Service and Form first
3. No selections made → Select at least one service or form
### Code Already Exists Error
- The Code you entered is already used by another notification
- Solution: Use a different, unique code
- Remember: Codes are case-sensitive and must be uppercase
### Template Body Email Not Saving
- Include plain, unformatted text so it doesn't cause problems
## Summary
The Email Notification module provides a comprehensive system for creating and managing email notifications. Key points to remember:
- **Required fields** must be filled before saving
- **Service/Form Type** configuration is only available after saving the notification
- **Result Test cards** appear when Form Status is "Complete" and appropriate forms are selected
- **Form Status changes** to "Incomplete" will delete all Result Test selections
- **Code field** cannot be changed after creation
- Always verify your configuration before finalizing
For additional support or questions, refer to the documentation button in the Email Notifications list or contact your system administrator.